Category: Dev Stuff

  • Get First Date of Week in Google Sheets, When the Week of the Year is Related to the Row Number

    Get First Date of Week in Google Sheets, When the Week of the Year is Related to the Row Number

    *phew* what a title

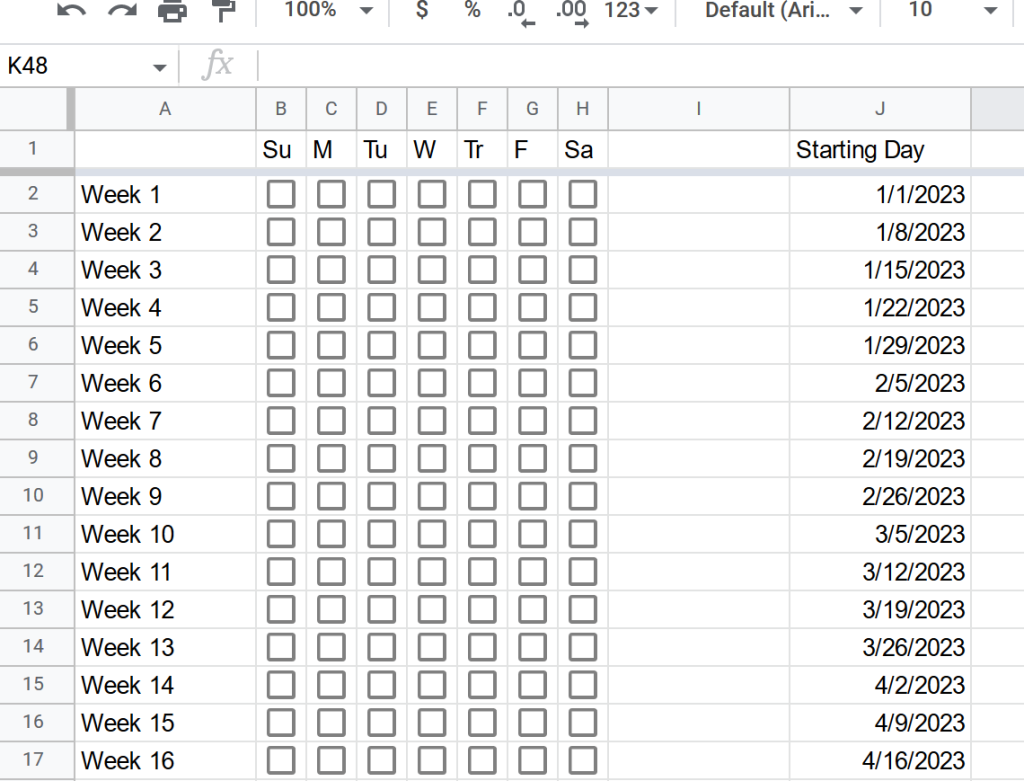
    For a recent project, I wanted to set up a Google Sheet that tracked something daily/weekly. I wanted one column to show the starting day of the week to help keep me on track, and I ended up with this:

    I used ChatGPT to help me make the formula to determine the first day of the week, indexed to the current row:

    =DATE(YEAR(TODAY()), MONTH(DATE(YEAR(TODAY()),1,1)+(ROW()-2)*7-WEEKDAY(DATE(YEAR(TODAY()),1,1))+1), DAY(DATE(YEAR(TODAY()),1,1)+(ROW()-2)*7-WEEKDAY(DATE(YEAR(TODAY()),1,1))+1))

    This is how ChatGPT explains how the function works:

    This Google Sheets function returns the date that corresponds to the first day of the week for a given row number. The row number is specified by the ROW() function, which returns the row number of the current cell.

    The function uses the following steps to calculate the date:

    1. It uses the YEAR(TODAY()) function to get the current year.
    2. It uses the DATE(YEAR(TODAY()),1,1) function to get the first day of the current year (e.g. January 1).
    3. It uses the WEEKDAY(DATE(YEAR(TODAY()),1,1)) function to get the day of the week of the first day of the year as a number (e.g. 1 for Monday, 2 for Tuesday, etc.).
    4. It uses the (ROW()-2)*7 expression to calculate the number of days to skip from the first day of the year to get to the desired week. For example, if the ROW() function returns 2, then the expression will evaluate to 0, which means that no days need to be skipped. If the ROW() function returns 3, then the expression will evaluate to 7, which means that one week needs to be skipped.
    5. It uses the DATE(YEAR(TODAY()),1,1)+(ROW()-2)*7-WEEKDAY(DATE(YEAR(TODAY()),1,1))+1 expression to calculate the date that corresponds to the first day of the week for the given row number.
    6. It uses the MONTH(DATE(YEAR(TODAY()),1,1)+(ROW()-2)*7-WEEKDAY(DATE(YEAR(TODAY()),1,1))+1) function to get the month of the calculated date.
    7. It uses the DAY(DATE(YEAR(TODAY()),1,1)+(ROW()-2)*7-WEEKDAY(DATE(YEAR(TODAY()),1,1))+1) function to get the day of the month of the calculated date.
    8. It uses the DATE() function to combine the year, month, and day into a single date.

    For example, if the ROW() function returns 2 and the current year is 2022, the function will return the date January 3, 2022. If the ROW() function returns 3 and the current year is 2022, the function will return the date January 10, 2022.

    It took a lot of trial and error, and manual adjustments to get the function to work, and it was really fun to play with ChatGPT and work together to get this working. While I could have trial and errored myself to the end functionality eventually, this did end up saving me quite a bit of time.

    If you, random Internet stranger, want to use this function yourself, but your rows aren’t lined up the same as mine, you’ll just need to adjust the (ROW()-2) type areas to change the row offset you’re currently starting at.

  • Quick Tip: Bash CLI params

    Quick Tip: Bash CLI params

    While working on a bash script, I stumbled upon what I think may be the cleanest and simplest way to add CLI params to a bash script so far:

    https://stackoverflow.com/questions/192249/how-do-i-parse-command-line-arguments-in-bash/14203146#14203146

    This lets you use short (-V), long (--version), space separated (--user john), and equal separated (--user=john) arguments.

    It’s not perfect, but for a quick bash script hack, I’ve found it very useful!

  • Nano: The One True Editor

    Nano: The One True Editor

    Forget about vi/vim/edlin. Nano is the only editor that you need in the console. Sure, it may not be perfect, but with a few extra steps in .nanorc it can really be a great experience. Here’s my .nanorc with some comments showing what’s changed:

    ## Automatically indent a newly created line to the same number of tabs and/or spaces as the previous line (or as the next line if the previous line is the beginning of a paragraph).
    unset autoindent
    
    ## Use bold instead of reverse video
    set boldtext
    
    ## Save the last hundred search strings and replacement strings and executed commands, so they can be easily reused in later sessions.
    set historylog
    
    ## Display line numbers to the left of the text area.
    set linenumbers
    
    ## Enable mouse support, if available for your system. When enabled, mouse clicks can be used to place the cursor, set the mark (with a double click), and execute shortcuts. The mouse will work in the X Window System, and on the console when gpm is running. Text can still be selected through dragging by holding down the Shift key.
    set mouse
    
    ## Save the cursor position of files between editing sessions. The cursor position is remembered for the 200 most-recently edited files.
    set positionlog
    
    ## Use a tab size of number columns. The value of number must be greater than 0. The default value is 8.
    set tabsize 4
    
    ## Default Syntax Highlighting
    include "/usr/share/nano/asm.nanorc"
    include "/usr/share/nano/autoconf.nanorc"
    include "/usr/share/nano/awk.nanorc"
    include "/usr/share/nano/c.nanorc"
    include "/usr/share/nano/changelog.nanorc"
    include "/usr/share/nano/cmake.nanorc"
    include "/usr/share/nano/css.nanorc"
    include "/usr/share/nano/debian.nanorc"
    include "/usr/share/nano/default.nanorc"
    include "/usr/share/nano/elisp.nanorc"
    include "/usr/share/nano/fortran.nanorc"
    include "/usr/share/nano/gentoo.nanorc"
    include "/usr/share/nano/go.nanorc"
    include "/usr/share/nano/groff.nanorc"
    include "/usr/share/nano/guile.nanorc"
    include "/usr/share/nano/html.nanorc"
    include "/usr/share/nano/java.nanorc"
    include "/usr/share/nano/javascript.nanorc"
    include "/usr/share/nano/json.nanorc"
    include "/usr/share/nano/lua.nanorc"
    include "/usr/share/nano/makefile.nanorc"
    include "/usr/share/nano/man.nanorc"
    include "/usr/share/nano/mgp.nanorc"
    include "/usr/share/nano/mutt.nanorc"
    include "/usr/share/nano/nanorc.nanorc"
    include "/usr/share/nano/nftables.nanorc"
    include "/usr/share/nano/objc.nanorc"
    include "/usr/share/nano/ocaml.nanorc"
    include "/usr/share/nano/patch.nanorc"
    include "/usr/share/nano/perl.nanorc"
    include "/usr/share/nano/php.nanorc"
    include "/usr/share/nano/po.nanorc"
    include "/usr/share/nano/postgresql.nanorc"
    include "/usr/share/nano/pov.nanorc"
    include "/usr/share/nano/python.nanorc"
    include "/usr/share/nano/ruby.nanorc"
    include "/usr/share/nano/rust.nanorc"
    include "/usr/share/nano/sh.nanorc"
    include "/usr/share/nano/spec.nanorc"
    include "/usr/share/nano/tcl.nanorc"
    include "/usr/share/nano/tex.nanorc"
    include "/usr/share/nano/texinfo.nanorc"
    include "/usr/share/nano/xml.nanorc"Code language: PHP (php)

  • Quick Tip: Export WordPress SQL output via WP-CLI

    Quick Tip: Export WordPress SQL output via WP-CLI

    If for some reason you can’t run wp db query, but need to export SQL output to a CSV or other file, then have a look at this small WP-CLI command I whipped up that should allow this:

    /**
     * Runs a SQL query against the site database.
     *
     * ## OPTIONS
     *
     * 
     * : SQL Query to run.
     *
     * [--format=]
     * : Render output in a particular format.
     * ---
     * default: table
     * options:
     * - table
     * - csv
     * - json
     * - count
     * - yaml
     * ---
     *
     * [--dry-run=]
     * : Performa a dry run
     *
     * @subcommand sql
     */
    public function sql( $args, $assoc_args ) {
         global $wpdb;
     
         $sql     = $args[0];
         $format  = WP_CLI\Utils\get_flag_value( $assoc_args, 'format', 'table' );
         $dry_run = WP_CLI\Utils\get_flag_value( $assoc_args, 'dry-run', 'true' );
     
         // Just some precautions.
         if ( preg_match( '/[update|delete|drop|insert|create|alter|rename|truncate|replace]/i', $sql ) ) {
             WP_CLI::error( 'Please do not modify the database with this command.' );
         }
     
         if ( 'false' !== $dry_run ) {
             WP_CLI::log( WP_CLI::colorize( '%gDRY-RUN%n: <code>EXPLAIN</code> of the query is below: https://mariadb.com/kb/en/explain/' ) );
             $sql = 'EXPLAIN ' . $sql;
         }
     
         // Fetch results from database.
         $results = $wpdb->get_results( $sql, ARRAY_A ); // phpcs:ignore WordPress.DB
     
         // Output data.
         WP_CLI\Utils\format_items( $format, $results, array_keys( $results[0] ) );
    }Code language: PHP (php)

    I’d add an example here, but I don’t have any right now that I can share 😐 I’ll try to find one later (don’t hold your breath on me remembering to do that)

  • phpMyAdmin and MariaDB with Docker

    phpMyAdmin and MariaDB with Docker

    I used to run a MariaDB server on an old Linux machine for working with database dumps and other things, but after moving all of that to a new Raspberry Pi 4, I never really set it back up.

    So instead I thought I’d play with this fancy new Docker stuff all the cool kids are talking about. I ended up getting phpMyAdmin and MariaDB working with Docker on my MacBook Pro.

    Caveat:

    To start up the MariaDB container thing, I ran this command:

    docker run -d \
     -v $HOME:/home/hosthome \
     --name mariadb \
     -e MYSQL_ROOT_PASSWORD=hunter2 \
     -e MYSQL_DATABASE='default_db' \
     mariadbCode language: JavaScript (javascript)

    A few things here you might want to make note of:

    • hunter2 – My MariaDB root password.
    • default_db – The default database created, just to make things easy.
    • $HOME – This attached my local machine’s home directory to the MariaDB container so I can import/export files.

    Secondly, I ran this to start phpMyAdmin and connect it to the Docker container:

    docker run -d \
     --name phpmyadmin \
     --link mariadb:db \
     -p 8081:80 \
     -e UPLOAD_LIMIT='4096M' \
     phpmyadmin/phpmyadminCode language: JavaScript (javascript)

    A few things here you might want to make note of:

    • 8081 – This is the local machine port that I will connect to via HTTP
    • 4096M – The default upload limit, set to 4 Gigs.

    Now, once this done, you should be able to connect to phpMyAdmin via http://localhost:8081/ and do all sorts of terrible things.

    Here’s a few more commands that may come in handy:

    Start a shell in the MariaDB container: docker exec -it mariadb bash

    Import a SQL file: docker exec -i mariadb sh -c 'exec mysql -uroot -phunter2 default_db' < /some/path/on/your/host/all-databases.sql

    Start a MariaDB “mysql” shell: docker exec -it mariadb sh -c 'exec mysql -uroot -phunter2 default_db'

    References that helped me:

  • Converting CSV to SQL

    Converting CSV to SQL

    I was recently working on an issue that required me to dig through gigabytes of CSV files to look for patterns and data points. I had no intention of bringing all of this data in to Excel, because there’s not enough RAM on earth for that to work. Instead I thought it would be easier to dump the data into MariaDB (MySQL would be fine as well) and just write some simple SQL statements.

    There were a few things I tried, such as LOAD DATA INFILE and other SQL type things. Nothing really worked properly, so instead I decided to just convert the CSV files into SQL statements I could import.

    This is a bad idea! Don’t ever let this touch a live production database!

    I wrote this little PHP script to convert all of the CSV files in a directory to SQL:

    <?php
    $files    = glob( './*.{csv}', GLOB_BRACE );
    $db_table = 'csv_table';
    
    foreach ( $files as $file ) {
    	$row       = 0;
    	$handle    = fopen( $file, 'rb' );
    	$row_names = '';
    
    	if ( false !== $handle ) {
    		while ( false !== ( $data = fgetcsv( $handle ) ) ) {
    			$row++;
    			$values = '';
    
    			if ( 1 === $row ) {
    				// Do Header things.
    				$index  = 0;
    
    				echo sprintf( 'DROP TABLE IF EXISTS `%s`;' . PHP_EOL, $db_table );
    				echo sprintf( 'CREATE TABLE `%s` (' . PHP_EOL, $db_table );
    
    				foreach ( $data as $key => $value ) {
    					$index++;
    					$data[ $key ] = strtolower( preg_replace( '/[^A-Za-z0-9]/', '_', $value ) );
    
    					// Add a comma if we're not at the end of the array.
    					if ( count( $data ) !== $index ) {
    						echo sprintf( '	`%s` text NOT NULL,' . PHP_EOL, $data[ $key ] );
    					} else {
    						echo sprintf( '	`%s` text NOT NULL' . PHP_EOL, $data[ $key ] );
    					}
    				}
    
    				echo ') ENGINE=InnoDB DEFAULT CHARSET=utf8mb4;' . PHP_EOL;
    				$row_names = '(`' . implode( '`,`', $data ) . '`)';
    				continue;
    			}
    
    			foreach ( $data as $key => $value ) {
    				$data[ $key ] = fake_sql_escape( $value );
    			}
    
    			$values = '(\'' . implode( '\',\'', $data ) . '\')';
    
    			echo sprintf( 'INSERT INTO `%s` %s VALUES %s;' . PHP_EOL, $db_table, $row_names, $values );
    		}
    		fclose( $handle );
    	}
    }
    
    function fake_sql_escape( $value ) {
    	// https://stackoverflow.com/questions/1162491/alternative-to-mysql-real-escape-string-without-connecting-to-db/1163091#1163091
    	// Totaly not safe for production!
    	$return = '';
    	$length = strlen( $value );
    
    	for ( $i = 0; $i < $length; ++$i ) {
    		$char = $value[ $i ];
    		$ord  = ord( $char );
    		if (
    			"'" !== $char &&
    			'"' !== $char &&
    			'\\' !== $char &&
    			$ord >= 32 &&
    			$ord <= 126
    		) {
    			$return .= $char;
    		} else {
    			$return .= '\\x' . dechex( $ord );
    		}
    	}
    	return $return;
    }Code language: PHP (php)

    Borrowing the example airtravel.csv from https://people.sc.fsu.edu/~jburkardt/data/csv/csv.html this is what the output looks like:

    DROP TABLE IF EXISTS `csv_table`;
    CREATE TABLE `csv_table` (
    	`month` text NOT NULL,
    	`1958` text NOT NULL,
    	`1959` text NOT NULL,
    	`1960` text NOT NULL
    ) ENGINE=InnoDB DEFAULT CHARSET=utf8mb4;
    INSERT INTO `csv_table` (`month`,`1958`,`1959`,`1960`,`type`) VALUES ('JAN','  340','  360','  417');
    INSERT INTO `csv_table` (`month`,`1958`,`1959`,`1960`,`type`) VALUES ('FEB','  318','  342','  391');
    INSERT INTO `csv_table` (`month`,`1958`,`1959`,`1960`,`type`) VALUES ('MAR','  362','  406','  419');
    INSERT INTO `csv_table` (`month`,`1958`,`1959`,`1960`,`type`) VALUES ('APR','  348','  396','  461');
    INSERT INTO `csv_table` (`month`,`1958`,`1959`,`1960`,`type`) VALUES ('MAY','  363','  420','  472');
    INSERT INTO `csv_table` (`month`,`1958`,`1959`,`1960`,`type`) VALUES ('JUN','  435','  472','  535');
    INSERT INTO `csv_table` (`month`,`1958`,`1959`,`1960`,`type`) VALUES ('JUL','  491','  548','  622');
    INSERT INTO `csv_table` (`month`,`1958`,`1959`,`1960`,`type`) VALUES ('AUG','  505','  559','  606');
    INSERT INTO `csv_table` (`month`,`1958`,`1959`,`1960`,`type`) VALUES ('SEP','  404','  463','  508');
    INSERT INTO `csv_table` (`month`,`1958`,`1959`,`1960`,`type`) VALUES ('OCT','  359','  407','  461');
    INSERT INTO `csv_table` (`month`,`1958`,`1959`,`1960`,`type`) VALUES ('NOV','  310','  362','  390');
    INSERT INTO `csv_table` (`month`,`1958`,`1959`,`1960`,`type`) VALUES ('DEC','  337','  405','  432');Code language: JavaScript (javascript)

    And if you’re too lazy to see what the input CSV looks like (I would be) here it is, in its LGPL glory:

    "Month", "1958", "1959", "1960"
    "JAN",  340,  360,  417
    "FEB",  318,  342,  391
    "MAR",  362,  406,  419
    "APR",  348,  396,  461
    "MAY",  363,  420,  472
    "JUN",  435,  472,  535
    "JUL",  491,  548,  622
    "AUG",  505,  559,  606
    "SEP",  404,  463,  508
    "OCT",  359,  407,  461
    "NOV",  310,  362,  390
    "DEC",  337,  405,  432Code language: JavaScript (javascript)

    There’s a lot of ways that this could be made better, but it works in a quick pinch. If you need something similar, feel free to take this as a starting point.

  • Quick Tip: Looping a command in bash

    Quick Tip: Looping a command in bash

    I recently came across the need to watch my disk space while running a slow program to make sure I didn’t run out. If I did, the command would fail silently and I’d have to start over again.

    This can easily be done with this short snippet:

    watch -n10 bash -c "df -h | ack disk1s5"Code language: JavaScript (javascript)
    Every 10.0s: bash -c df -h | ack disk1s5                                                                                  mbp.local: Mon Jul 20 15:09:51 2020
    
    /dev/disk1s5           488245288  10940872 144033352     8%   488237 4881964643    0%   /

    The important part here is disk1s5, which is the device file for the partition I wanted to watch. If you need to find this, it can be done simply by running the df as a whole:

    $ df
    Filesystem             1K-blocks      Used Available Capacity  iused      ifree %iused  Mounted on
    /dev/disk1s5           488245288  10940872 144035124     8%   488237 4881964643    0%   /
    devfs                        191       191         0   100%      662          0  100%   /dev
    /dev/disk1s1           488245288 331456068 144035124    70%  1379027 4881073853    0%   /System/Volumes/Data
    /dev/disk1s4           488245288   1048596 144035124     1%        1 4882452879    0%   /private/var/vm
    map auto_home                  0         0         0   100%        0          0  100%   /System/Volumes/Data/home
    /dev/disk1s3           488245288    516448 144035124     1%       48 4882452832    0%   /Volumes/RecoveryCode language: PHP (php)

    That is all.

    Photo by Wendy Wei from Pexels

  • Open source ngrok alternative

    Open source ngrok alternative

    During a client onsite last year, I was first introduced to ngrok. Ngrok provides “secure introspectable tunnels to localhost.” The free tier of ngrok provides temporary, random subdomains to use. This is fine most of the time, but kind of causes problems for things like Jetpack that require persistent domain names for connecting.

    While I could shell out the $5/month for the lowest paid tier of ngrok, I would still be limited to a certain number of domains and connections.

    While looking for an alternative to ngrok, I came across sish. Sish is “an open source serveo/ngrok alternative. HTTP(S)/WS(S)/TCP Tunnels to localhost using only SSH.” To be honest, I don’t understand most of those words, but that won’t stop me!

    I of course needed a server somewhere to run this on, so I ran over to DigitalOcean and decided to spend my $5/month on a general purpose VPS instead (Here’s my DigitalOcean referral link if you’re so inclined).

    What follows is my notes I took to install sish and get it up and running. I can’t guarantee they’re perfect, and I don’t feel like deleting my VPS and starting over again just to make sure 🙂 If you see something wrong, feel free to comment me a correction or question.

    Step 1: Make a wildcard subdomain (ex *.sish.example.com)

    Step 2: Set up a DigitalOcean droplet.

    Step 3. Log in and run:

    # Make a house a home
    echo "export PS1=\"\\[\\033[38;5;33m\\]\\u\\[\$(tput sgr0)\\]\\[\\033[38;5;11m\\]@\\[\$(tput sgr0)\\]\\[\\033[38;5;33m\\]\\H\\[\$(tput sgr0)\\]\\[\\033[38;5;15m\\]:\\[\$(tput sgr0)\\]\\[\\033[38;5;11m\\]\\w\\[\$(tput sgr0)\\]\\[\\033[38;5;15m\\]\\\\$ \\[\$(tput sgr0)\\]\"" >> ~/.bashrc
    source ~/.bashrc
    apt update
    apt upgrade
    apt install ack-grep mc byobu git curl locate
    updatedb
    
    # Security
    ufw allow http
    ufw allow https
    ufw allow ssh
    ufw allow 2222
    ufw --force enable
    apt install fail2ban
    
    # Create swapfile
    fallocate -l 1G /swapfile
    chmod 600 /swapfile
    mkswap /swapfile
    swapon /swapfile
    echo '/swapfile none swap sw 0 0' | tee -a /etc/fstab
    
    # Install Docker
    apt install apt-transport-https ca-certificates curl gnupg-agent software-properties-common
    curl -fsSL https://download.docker.com/linux/ubuntu/gpg | sudo apt-key add -
    add-apt-repository "deb [arch=amd64] https://download.docker.com/linux/ubuntu/ $(lsb_release -cs) stable"
    apt update
    apt install docker-ce docker-ce-cli containerd.io
    
    # Install Certbot
    certbot-auto certonly --manual -d *.sish.example.com --agree-tos --no-bootstrap --preferred-challenges dns-01 --server https://acme-v02.api.letsencrypt.org/directory
    certbot certonly –manual -d *.sish.example.com –agree-tos –no-bootstrap –manual-public-ip-logging-ok –preferred-challenges dns-01 –server https://acme-v02.api.letsencrypt.org/directory
    
    # Install Keys
    curl https://github.com/my_github_username.keys > ~/sish/pubkeys/my_github_username
    cp -f /etc/letsencrypt/live/sish.example.com-0001/* ~/sish/ssl/
    ssh-keygen
    ln -s ~/.ssh/id_rsa ~/sish/ssh_key
    
    # Run Sish
    cat << "EOF" > /root/sish/docker-start.sh
    /usr/bin/docker run --name sish \
      -v ~/sish/ssl:/ssl \
      -v ~/sish/keys:/keys \
      -v ~/sish/pubkeys:/pubkeys \
      --restart unless-stopped \
      --net=host antoniomika/sish:latest \
      -sish.addr=sish.example.com:2222 \
      -sish.adminenabled=true \
      -sish.auth=false \
      -sish.bindrandom=false \
      -sish.domain=sish.example.com \
      -sish.forcerandomsubdomain=false \
      -sish.http=:80 \
      -sish.https=:443 \
      -sish.httpsenabled=true \
      -sish.httpspems=/ssl \
      -sish.keysdir=/pubkeys \
      -sish.pkloc=/keys/ssh_key \
      -sish.redirectrootlocation=https://example.com/ \
      -sish.serviceconsoleenabled=true
    EOF
    
    cat << EOF > /etc/systemd/system/docker-sish.service
    # Thanks to https://blog.container-solutions.com/running-docker-containers-with-systemd
    
    [Unit]
    Description=Sish container
    Requires=docker.service
    After=docker.service
    
    [Service]
    TimeoutStartSec=0
    Restart=always
    ExecStartPre=-/usr/bin/docker stop sish
    ExecStartPre=-/usr/bin/docker rm sish
    ExecStartPre=/usr/bin/docker pull antoniomika/sish:latest
    ExecStart=/bin/bash /root/sish/docker-start.sh
    ExecStop=/usr/bin/docker stop sish
    RemainAfterExit=true
    
    [Install]
    WantedBy=default.target
    EOF
    
    systemctl enable docker-sish
    systemctl start docker-sishCode language: PHP (php)

    From here, I can now set up a shortcut program to run locally to start a tunnel:

    cat << "EOF" > /usr/local/bin/sish
    #/bin/bash
    ssh -p 2222 -R $1:80:localhost:80 root@sish.example.com
    EOF
    chmod +x /usr/local/bin/sishCode language: PHP (php)

  • Quick Tip: Viewing Headers With Curl

    Quick Tip: Viewing Headers With Curl

    Something that I do often at work is to check HTTP headers for random things such as redirects, cache headers, proxies, ssl, etc.

    A common way this is done is by using the -I (--header) switch:

    $ curl -I http://example.com/
    HTTP/1.1 200 OK
    Content-Encoding: gzip
    Accept-Ranges: bytes
    Cache-Control: max-age=604800
    Content-Type: text/html
    Date: Wed, 27 Jun 2018 22:03:57 GMT
    Etag: "1541025663+gzip"
    Expires: Wed, 04 Jul 2018 22:03:57 GMT
    Last-Modified: Fri, 09 Aug 2013 23:54:35 GMT
    Server: ECS (atl/FC94)
    X-Cache: HIT
    Content-Length: 606
    Code language: JavaScript (javascript)

    The downside to this is that it uses an HTTP HEAD request, which can sometimes return different headers or different information than a standard GET request. This can be fixed by using the -X (--request) switch. This overrides the default HEAD?request with whatever you choose:

    $ curl -I -XGET http://example.com/
    HTTP/1.1 200 OK
    Accept-Ranges: bytes
    Cache-Control: max-age=604800
    Content-Type: text/html
    Date: Wed, 27 Jun 2018 22:07:47 GMT
    Etag: "1541025663"
    Expires: Wed, 04 Jul 2018 22:07:47 GMT
    Last-Modified: Fri, 09 Aug 2013 23:54:35 GMT
    Server: ECS (atl/FC90)
    Vary: Accept-Encoding
    X-Cache: HIT
    Content-Length: 1270
    Code language: JavaScript (javascript)

    I like to just combine them into one quick command: curl -IXGET http://example.com/