Oh boy, how did we end up here?
When the first macOS Sequoia public beta came out, I went ahead and installed it on my 2019 Intel MacBook Pro. I’ve never had a problem with public betas, and usually try them out.
Well, this time something went wrong. I don’t remember the details, but the install crashed, froze, or borked somehow near the end. I restarted and it seemed to finish.
… but we wouldn’t be here if that were the end of the story…
Something felt off, and whenever I rebooted my MacBook Pro, anything I did reverted itself to back to the end of the public beta install. I was stuck in some sort of disk snapshot mode. I tried repairing the disk, I tried rebooting into single user mode and fixing things, all sorts of stuff I tried to think of, stuff I googled, and stuff I dangerously got from ChatGPT. Nothing would fix it to where I could permanently modify my drive anymore.
So I did what anyone would do–I backed up my important files and completely reformatted the drive and did a fresh install once the final version of Sequoia came out.
And that worked, and things were fine. Except for some random crashes every now and then. Sometimes a Firefox tab would crash. Sometimes the machine would not come out of sleep. Sometimes Messages would not sync from iCloud. Sometimes entire programs would crash.
I had just assumed it was the perils of the new macOS on older hardware, and I kept going forward… 15.1 came out, and problems persisted… 15.2…. 15.3… well, by now any bugs should be fixed! Something is wrong. I of course understand that these random crashes feel a lot like bad memory, but I was in denial. The MacBook had soldered RAM and there was nothing I could 😭
I first went with Memtester as a quick test, just to confirm that my RAM is fine:
$ sudo memtester 16G 2
Password:
memtester version 4.7.0 (64-bit)
Copyright (C) 2001-2024 Charles Cazabon.
Licensed under the GNU General Public License version 2 (only).

pagesize is 4096
pagesizemask is 0xfffffffffffff000
want 16384MB (17179869184 bytes)
got  16384MB (17179869184 bytes), trying mlock ...locked.
Loop 1/2:
  Stuck Address       : testing   1FAILURE: possible bad address line at offset 0x0000000254c27038.
Skipping to next test...
  Random Value        : FAILURE: 0x06bf7b9befebc9e5 != 0x0ebf7b9befebc9e5 at offset 0x0000000054c27840.
FAILURE: 0x2106487df0007127 != 0x2906487df0007127 at offset 0x0000000054c27030.
FAILURE: 0x2106487df0007127 != 0x2906487df0007127 at offset 0x0000000054c27038.
FAILURE: 0x2106487df0007127 != 0x2906487df0007127 at offset 0x0000000054c28238.
  Compare XOR         :   Compare SUB         : ok
FAILURE: 0x0400ed73c8282b4d != 0x0c00ed73c8282b4d at offset 0x0000000054c27038.
FAILURE: 0x0400ed73c8282b4d != 0x0c00ed73c8282b4d at offset 0x0000000054c28238.
  Compare MUL         : FAILURE: 0x0000000000000002 != 0x0800000000000002 at offset 0x0000000054c27030.
FAILURE: 0x0000000000000002 != 0x0800000000000002 at offset 0x0000000054c27038.
FAILURE: 0x0000000000000002 != 0x0800000000000002 at offset 0x0000000054c28238.
  Compare DIV         :   Compare OR          : ok
  Compare AND         : ok
  Sequential Increment: ok
  Solid Bits          : testing   0FAILURE: 0x0000000000000000 != 0x0800000000000000 at offset 0x0000000054c27038.
FAILURE: 0x0000000000000000 != 0x0800000000000000 at offset 0x0000000054c28238.
  Block Sequential    : testing   0FAILURE: 0x0000000000000000 != 0x0800000000000000 at offset 0x0000000054c27030.
FAILURE: 0x0000000000000000 != 0x0800000000000000 at offset 0x0000000054c27038.
FAILURE: 0x0000000000000000 != 0x0800000000000000 at offset 0x0000000054c28238.
  Checkerboard        : testing   1FAILURE: 0x5555555555555555 != 0x5d55555555555555 at offset 0x0000000054c27038.
FAILURE: 0x5555555555555555 != 0x5d55555555555555 at offset 0x0000000054c28238.
  Bit Spread          : testing  57FAILURE: 0xf5ffffffffffffff != 0xfdffffffffffffff at offset 0x0000000054c27038.
  Bit Flip            : testing   0FAILURE: 0x0000000000000001 != 0x0800000000000001 at offset 0x0000000054c27038.
FAILURE: 0x0000000000000001 != 0x0800000000000001 at offset 0x0000000054c28238.
  Walking Ones        : setting   4Code language: PHP (php)
I was nervous! There were failures! But I also knew that testing live in the OS isn’t perfect, so maybe there was a chance! I whipped up a flash drive with Memtest86 to prove that my memory was still good. Phew.
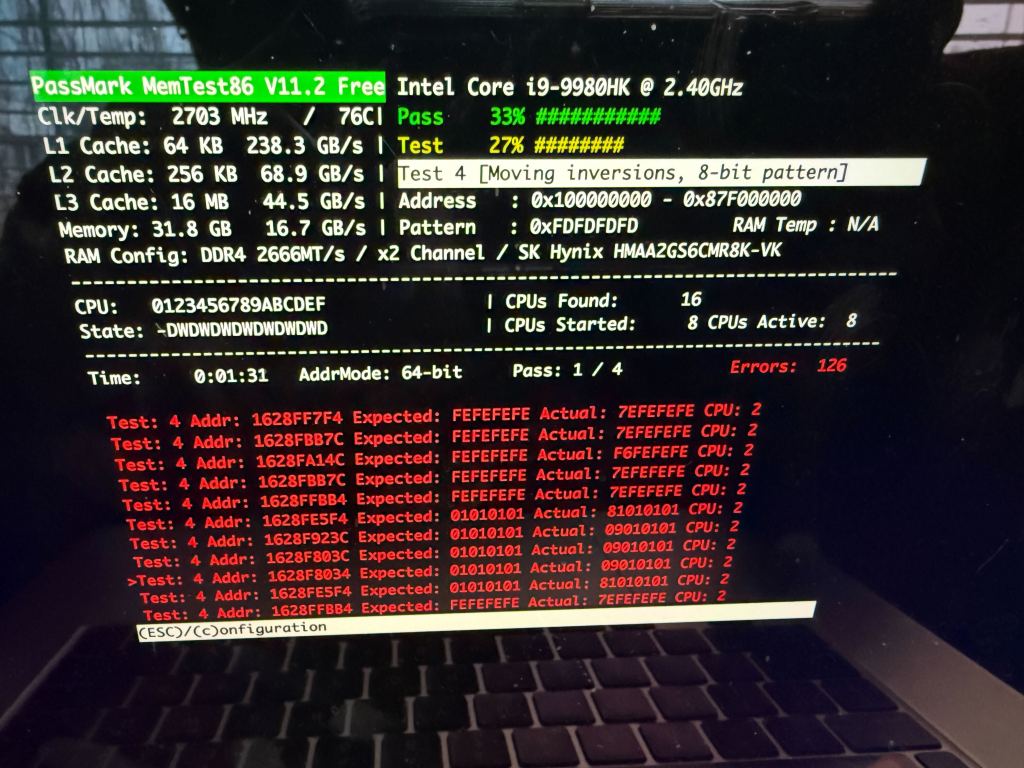
Yeah… about that…
I had a serious problem! This machine is still perfectly fine. I had to make a choice:
- I could try to repair it myself. I’ve never done any BGA work myself, but I’ve seen plenty of it done and honestly how hard could it be? *nervous chuckle*
- I could pay to get this fixed. That’s the safest solution.
- I could install Linux and use
badramto just ignore the problem. The problem with this is that I’d lose all of the MacOS magic with the ecosystem.
Alright, so let’s go with the safest option first. I fired off a quote request to Rossman Repair Group, who seem to be the best at this stuff.

*sad trombone noises*
Alright, so the choices are clear. I can either start hacking away at my hardware or try some software based solutions. I knew that Linux had a nice badram option with Grub, so I started searching around to see if there was any way at all to get that working for macOS.
I searched and continued to come up with nothing. There was no way that I could find to get badram to work with macOS. Bummer.
…there’s a glimmer of hope though…
In my many searches, I ran across this project:
Could this be what I need? Basically a badram type functionality for macOS? Sweet! Alright, let’s try this out.
So I can’t just magically install this software. It’s part of the EFI boot loader, so we need to install it there.
BUT WAIT THERE’S MORE. From what I was able to tell, I needed an EFI shell because macOS doesn’t have a built-in way to blacklist bad RAM addresses at boot like Linux’s badram does. So the plan was simple:
- Install an EFI shell that would let me run the RAM-disabling utility before macOS boots.
- Set up rEFInd as a boot manager to automate the process.
- Write an EFI shell script to block the bad RAM every time the system starts.
First, I grabbed the TianoCore UEFI Shell (aka Shell_Full.efi) from the official TianoCore repository. I copied it onto my EFI partition, so it could be accessed at boot. It went a little something like this:
sudo mkdir -p /Volumes/ESP
sudo mount -t msdos /dev/disk0s1 /Volumes/ESP
sudo cp ~/Downloads/Shell_Full.efi /Volumes/ESP/EFI/tools/ShellX64.efiCode language: JavaScript (javascript)
This meant that at boot, I’d have an EFI shell available to execute commands manually.
Rather than having to manually select the EFI shell every time, I installed rEFInd to make life easier. This boot manager would allow me to configure an automatic script to disable the bad RAM before macOS even loads.
After installing rEFInd and mounting the EFI partition again, I placed the RAM-disabling utility (disable-ram-area.efi) into the correct folder by running sudo cp disable-ram-area.efi /Volumes/ESP/EFI/refind/
Now came the fun part—writing a script (startup.nsh) that would automatically execute disable-ram-area.efi with the right parameters every time the system booted.
My bad RAM addresses (from MemTest86) were 0x1608F8078 – 0x1628FFCB4 (~32MB). To ensure alignment, I slightly expanded the range to 0x1608F7000 → 0x162A00000. This ensures that the entire faulty region is covered and avoids instability caused by page misalignment.
My final startup.nsh script looked like this:
echo Running disable-ram-area.efi

# Locate the EFI partition (fs0:)
set DISK fs0

# Check if disable-ram-area.efi exists
if not exist %DISK%\EFI\refind\disable-ram-area.efi then
    echo ERROR: Could not find disable-ram-area.efi in /EFI/refind/. Exiting...
    exit
endif

echo Found disable-ram-area.efi on %DISK%
stall 1000000

# Run the memory fix
%DISK%\EFI\refind\disable-ram-area.efi 0x1608F7000 0x162A00000

echo Starting macOS
stall 1000000

# Locate macOS bootloader (fs3:)
set MACOS fs3

# Check if boot.efi exists
if not exist %MACOS%\System\Library\CoreServices\boot.efi then
    echo ERROR: Could not find boot.efi in fs3:. Exiting...
    exit
endif

echo Found boot.efi on %MACOS%
stall 1000000

# Boot macOS
%MACOS%\System\Library\CoreServices\boot.efiCode language: PHP (php)
This script does the following:
- Finds the EFI partition (
fs0:) wheredisable-ram-area.efiis stored. - Runs
disable-ram-area.efiwith my calculated bad RAM range. - Finds the correct
fsX: partition that containsboot.efi(macOS bootloader). - Boots macOS, now with the bad RAM disabled.
After saving startup.nsh to /Volumes/ESP/EFI/refind/, I rebooted into rEFInd, selected “EFI Shell”, and ran:
fs0:
cd EFI/refind
startup.nsh
It worked! The script executed, disabled my bad RAM, and booted into macOS.
To make sure this runs automatically every time I turn on my Mac, I edited refind.conf and added:
menuentry "Boot macOS with Defective RAM Disabled" {
    loader /EFI/tools/ShellX64.efi
    options "fs0:\EFI\refind\startup.nsh"
}Code language: JavaScript (javascript)
And to set it as the default boot option, I updated:
default_selection "Boot macOS with Defective RAM Disabled"Code language: JavaScript (javascript)
Now, every time I boot up my Mac, it automatically disables the bad RAM before macOS loads! Huge win!
Now, this is just my story, please don’t take this as a tutorial. I rebuilt the entire process I have done through some scribbled notes, open tabs, and browser histories. I may have missed things or gotten them wrong and I’m too lazy to remount my EFI partition to verify that the scripts I shared here are the final ones I actually used.
But if you find yourself in a similar position, hopefully this helps you with your own process of trying to save your MacBook.