Tag: macos

  • How I Saved My MacBook Pro From Bad RAM

    How I Saved My MacBook Pro From Bad RAM

    Oh boy, how did we end up here?

    When the first macOS Sequoia public beta came out, I went ahead and installed it on my 2019 Intel MacBook Pro. I’ve never had a problem with public betas, and usually try them out.

    Well, this time something went wrong. I don’t remember the details, but the install crashed, froze, or borked somehow near the end. I restarted and it seemed to finish.

    … but we wouldn’t be here if that were the end of the story…

    Something felt off, and whenever I rebooted my MacBook Pro, anything I did reverted itself to back to the end of the public beta install. I was stuck in some sort of disk snapshot mode. I tried repairing the disk, I tried rebooting into single user mode and fixing things, all sorts of stuff I tried to think of, stuff I googled, and stuff I dangerously got from ChatGPT. Nothing would fix it to where I could permanently modify my drive anymore.

    So I did what anyone would do–I backed up my important files and completely reformatted the drive and did a fresh install once the final version of Sequoia came out.

    And that worked, and things were fine. Except for some random crashes every now and then. Sometimes a Firefox tab would crash. Sometimes the machine would not come out of sleep. Sometimes Messages would not sync from iCloud. Sometimes entire programs would crash.

    I had just assumed it was the perils of the new macOS on older hardware, and I kept going forward… 15.1 came out, and problems persisted… 15.2…. 15.3… well, by now any bugs should be fixed! Something is wrong. I of course understand that these random crashes feel a lot like bad memory, but I was in denial. The MacBook had soldered RAM and there was nothing I could 😭

    I first went with Memtester as a quick test, just to confirm that my RAM is fine:

    $ sudo memtester 16G 2
    Password:
    memtester version 4.7.0 (64-bit)
    Copyright (C) 2001-2024 Charles Cazabon.
    Licensed under the GNU General Public License version 2 (only).
    
    pagesize is 4096
    pagesizemask is 0xfffffffffffff000
    want 16384MB (17179869184 bytes)
    got  16384MB (17179869184 bytes), trying mlock ...locked.
    Loop 1/2:
      Stuck Address       : testing   1FAILURE: possible bad address line at offset 0x0000000254c27038.
    Skipping to next test...
      Random Value        : FAILURE: 0x06bf7b9befebc9e5 != 0x0ebf7b9befebc9e5 at offset 0x0000000054c27840.
    FAILURE: 0x2106487df0007127 != 0x2906487df0007127 at offset 0x0000000054c27030.
    FAILURE: 0x2106487df0007127 != 0x2906487df0007127 at offset 0x0000000054c27038.
    FAILURE: 0x2106487df0007127 != 0x2906487df0007127 at offset 0x0000000054c28238.
      Compare XOR         :   Compare SUB         : ok
    FAILURE: 0x0400ed73c8282b4d != 0x0c00ed73c8282b4d at offset 0x0000000054c27038.
    FAILURE: 0x0400ed73c8282b4d != 0x0c00ed73c8282b4d at offset 0x0000000054c28238.
      Compare MUL         : FAILURE: 0x0000000000000002 != 0x0800000000000002 at offset 0x0000000054c27030.
    FAILURE: 0x0000000000000002 != 0x0800000000000002 at offset 0x0000000054c27038.
    FAILURE: 0x0000000000000002 != 0x0800000000000002 at offset 0x0000000054c28238.
      Compare DIV         :   Compare OR          : ok
      Compare AND         : ok
      Sequential Increment: ok
      Solid Bits          : testing   0FAILURE: 0x0000000000000000 != 0x0800000000000000 at offset 0x0000000054c27038.
    FAILURE: 0x0000000000000000 != 0x0800000000000000 at offset 0x0000000054c28238.
      Block Sequential    : testing   0FAILURE: 0x0000000000000000 != 0x0800000000000000 at offset 0x0000000054c27030.
    FAILURE: 0x0000000000000000 != 0x0800000000000000 at offset 0x0000000054c27038.
    FAILURE: 0x0000000000000000 != 0x0800000000000000 at offset 0x0000000054c28238.
      Checkerboard        : testing   1FAILURE: 0x5555555555555555 != 0x5d55555555555555 at offset 0x0000000054c27038.
    FAILURE: 0x5555555555555555 != 0x5d55555555555555 at offset 0x0000000054c28238.
      Bit Spread          : testing  57FAILURE: 0xf5ffffffffffffff != 0xfdffffffffffffff at offset 0x0000000054c27038.
      Bit Flip            : testing   0FAILURE: 0x0000000000000001 != 0x0800000000000001 at offset 0x0000000054c27038.
    FAILURE: 0x0000000000000001 != 0x0800000000000001 at offset 0x0000000054c28238.
      Walking Ones        : setting   4Code language: PHP (php)

    I was nervous! There were failures! But I also knew that testing live in the OS isn’t perfect, so maybe there was a chance! I whipped up a flash drive with Memtest86 to prove that my memory was still good. Phew.
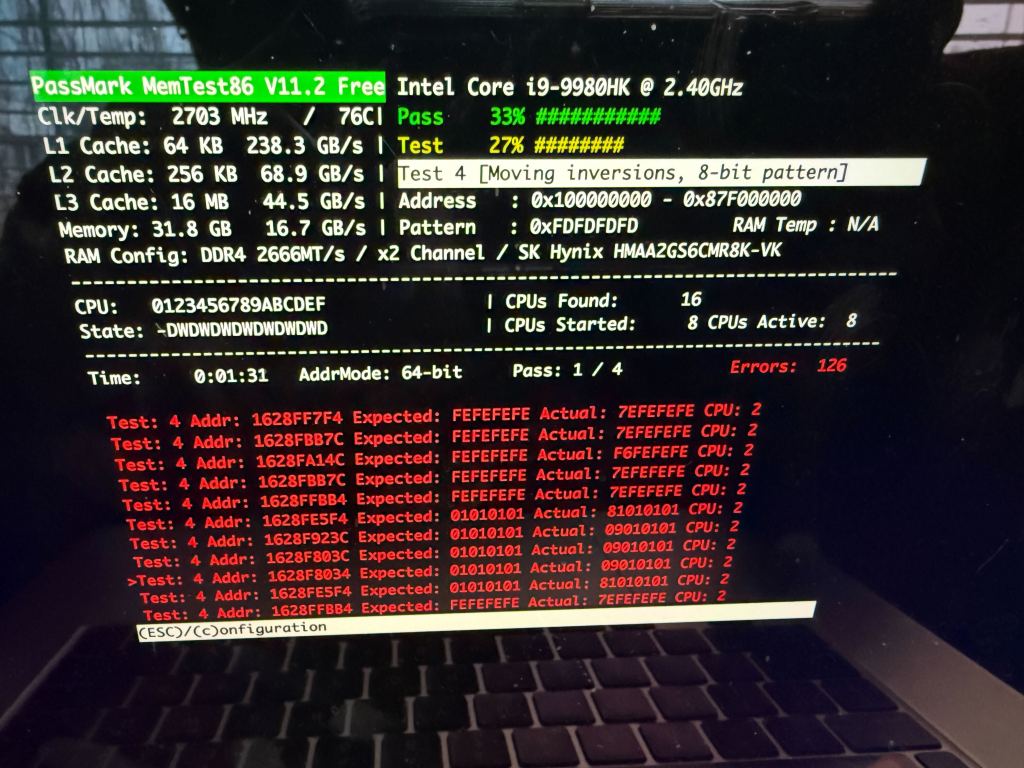
    Yeah… about that…

    I had a serious problem! This machine is still perfectly fine. I had to make a choice:

    1. I could try to repair it myself. I’ve never done any BGA work myself, but I’ve seen plenty of it done and honestly how hard could it be? *nervous chuckle*
    2. I could pay to get this fixed. That’s the safest solution.
    3. I could install Linux and use badram to just ignore the problem. The problem with this is that I’d lose all of the MacOS magic with the ecosystem.

    Alright, so let’s go with the safest option first. I fired off a quote request to Rossman Repair Group, who seem to be the best at this stuff.

    *sad trombone noises*

    Alright, so the choices are clear. I can either start hacking away at my hardware or try some software based solutions. I knew that Linux had a nice badram option with Grub, so I started searching around to see if there was any way at all to get that working for macOS.

    I searched and continued to come up with nothing. There was no way that I could find to get badram to work with macOS. Bummer.

    …there’s a glimmer of hope though…

    In my many searches, I ran across this project:

    Could this be what I need? Basically a badram type functionality for macOS? Sweet! Alright, let’s try this out.

    So I can’t just magically install this software. It’s part of the EFI boot loader, so we need to install it there.

    BUT WAIT THERE’S MORE. From what I was able to tell, I needed an EFI shell because macOS doesn’t have a built-in way to blacklist bad RAM addresses at boot like Linux’s badram does. So the plan was simple:

    1. Install an EFI shell that would let me run the RAM-disabling utility before macOS boots.
    2. Set up rEFInd as a boot manager to automate the process.
    3. Write an EFI shell script to block the bad RAM every time the system starts.


    First, I grabbed the TianoCore UEFI Shell (aka Shell_Full.efi) from the official TianoCore repository. I copied it onto my EFI partition, so it could be accessed at boot. It went a little something like this:

    sudo mkdir -p /Volumes/ESP
    sudo mount -t msdos /dev/disk0s1 /Volumes/ESP
    sudo cp ~/Downloads/Shell_Full.efi /Volumes/ESP/EFI/tools/ShellX64.efiCode language: JavaScript (javascript)

    This meant that at boot, I’d have an EFI shell available to execute commands manually.

    Rather than having to manually select the EFI shell every time, I installed rEFInd to make life easier. This boot manager would allow me to configure an automatic script to disable the bad RAM before macOS even loads.


    After installing rEFInd and mounting the EFI partition again, I placed the RAM-disabling utility (disable-ram-area.efi) into the correct folder by running sudo cp disable-ram-area.efi /Volumes/ESP/EFI/refind/


    Now came the fun part—writing a script (startup.nsh) that would automatically execute disable-ram-area.efi with the right parameters every time the system booted.

    My bad RAM addresses (from MemTest86) were 0x1608F80780x1628FFCB4 (~32MB). To ensure alignment, I slightly expanded the range to 0x1608F70000x162A00000. This ensures that the entire faulty region is covered and avoids instability caused by page misalignment.

    My final startup.nsh script looked like this:

    echo Running disable-ram-area.efi
    
    # Locate the EFI partition (fs0:)
    set DISK fs0
    
    # Check if disable-ram-area.efi exists
    if not exist %DISK%\EFI\refind\disable-ram-area.efi then
        echo ERROR: Could not find disable-ram-area.efi in /EFI/refind/. Exiting...
        exit
    endif
    
    echo Found disable-ram-area.efi on %DISK%
    stall 1000000
    
    # Run the memory fix
    %DISK%\EFI\refind\disable-ram-area.efi 0x1608F7000 0x162A00000
    
    echo Starting macOS
    stall 1000000
    
    # Locate macOS bootloader (fs3:)
    set MACOS fs3
    
    # Check if boot.efi exists
    if not exist %MACOS%\System\Library\CoreServices\boot.efi then
        echo ERROR: Could not find boot.efi in fs3:. Exiting...
        exit
    endif
    
    echo Found boot.efi on %MACOS%
    stall 1000000
    
    # Boot macOS
    %MACOS%\System\Library\CoreServices\boot.efiCode language: PHP (php)

    This script does the following:

    1. Finds the EFI partition (fs0:) where disable-ram-area.efi is stored.
    2. Runs disable-ram-area.efi with my calculated bad RAM range.
    3. Finds the correct fsX: partition that contains boot.efi (macOS bootloader).
    4. Boots macOS, now with the bad RAM disabled.

    After saving startup.nsh to /Volumes/ESP/EFI/refind/, I rebooted into rEFInd, selected “EFI Shell”, and ran:

    fs0:
    cd EFI/refind
    startup.nsh

    It worked! The script executed, disabled my bad RAM, and booted into macOS.

    To make sure this runs automatically every time I turn on my Mac, I edited refind.conf and added:

    menuentry "Boot macOS with Defective RAM Disabled" {
        loader /EFI/tools/ShellX64.efi
        options "fs0:\EFI\refind\startup.nsh"
    }Code language: JavaScript (javascript)


    And to set it as the default boot option, I updated:

    default_selection "Boot macOS with Defective RAM Disabled"Code language: JavaScript (javascript)


    Now, every time I boot up my Mac, it automatically disables the bad RAM before macOS loads! Huge win!

    Now, this is just my story, please don’t take this as a tutorial. I rebuilt the entire process I have done through some scribbled notes, open tabs, and browser histories. I may have missed things or gotten them wrong and I’m too lazy to remount my EFI partition to verify that the scripts I shared here are the final ones I actually used.

    But if you find yourself in a similar position, hopefully this helps you with your own process of trying to save your MacBook.
  • Capturing MacOS Settings Changes

    Capturing MacOS Settings Changes

    Let me get this right out. I upgraded to MacOS 15 beta and it totally borked my machine. I had to do a full, fresh reinstall.

    Totally my fault, and I should have prepared better.

    So now, I’m trying to remember to capture my personal settings so I can use a shell script to restore them in case of emergency with defaults

    With the help of ChatGPT and a lot of stupidity, I have created this:

    #!/bin/bash
    
    # Set the DEBUG flag (default is false)
    DEBUG=false
    
    # Define a function for logging debug information
    log() {
        if [ "$DEBUG" = true ]; then
            echo "$@"
        fi
    }
    
    # Define a function for running commands with error suppression unless DEBUG is true
    run_command() {
        if [ "$DEBUG" = true ]; then
            "$@"
        else
            "$@" 2>/dev/null
        fi
    }
    
    # Step 1: Define directories for temporary files
    before_dir="/tmp/before_defaults"
    after_dir="/tmp/after_defaults"
    mkdir -p "$before_dir" "$after_dir"
    
    # Step 2: Capture system-wide and global preferences
    
    echo "Reading user-specific global preferences..."
    run_command defaults read -g > "$before_dir/user_global_defaults.plist"
    
    echo "Reading system-wide global preferences..."
    run_command sudo defaults read -g > "$before_dir/system_global_defaults.plist"
    
    echo "Reading user-specific system preferences..."
    run_command defaults read > "$before_dir/user_system_defaults.plist"
    
    echo "Reading system-wide system preferences..."
    run_command sudo defaults read > "$before_dir/system_system_defaults.plist"
    
    # Step 3: Get all domains and capture their preferences with and without sudo
    echo "Reading defaults for all domains..."
    domains=$(run_command defaults domains)
    for domain in $domains; do
        log "Reading user-specific defaults for domain: $domain"
        run_command defaults read "$domain" > "$before_dir/${domain}_user_defaults.plist"
        
        log "Reading system-wide defaults for domain: $domain"
        run_command sudo defaults read "$domain" > "$before_dir/${domain}_system_defaults.plist"
    done
    
    # Step 4: Capture network settings (excluding Launch Services to reduce noise)
    echo "Capturing network settings..."
    run_command sudo cp /Library/Preferences/SystemConfiguration/preferences.plist "$before_dir/network_settings.plist"
    
    echo "Current preferences saved. Please make your changes now."
    echo "Press any key to continue once you've made the changes..."
    read -n 1 -s
    
    # Step 5: Capture updated defaults
    echo "Reading updated user-specific global preferences..."
    run_command defaults read -g > "$after_dir/user_global_defaults.plist"
    
    echo "Reading updated system-wide global preferences..."
    run_command sudo defaults read -g > "$after_dir/system_global_defaults.plist"
    
    echo "Reading updated user-specific system preferences..."
    run_command defaults read > "$after_dir/user_system_defaults.plist"
    
    echo "Reading updated system-wide system preferences..."
    run_command sudo defaults read > "$after_dir/system_system_defaults.plist"
    
    echo "Reading updated defaults for all domains..."
    for domain in $domains; do
        log "Reading updated user-specific defaults for domain: $domain"
        run_command defaults read "$domain" > "$after_dir/${domain}_user_defaults.plist"
        
        log "Reading updated system-wide defaults for domain: $domain"
        run_command sudo defaults read "$domain" > "$after_dir/${domain}_system_defaults.plist"
    done
    
    echo "Capturing updated network settings..."
    run_command sudo cp /Library/Preferences/SystemConfiguration/preferences.plist "$after_dir/network_settings.plist"
    
    # Step 6: Compare before and after to identify changes with unified diffs and output results directly
    
    echo "Comparing preferences and generating diffs..."
    
    # Global and system diffs
    echo "Comparing global and system preferences..."
    diff -u "$before_dir/user_global_defaults.plist" "$after_dir/user_global_defaults.plist" | sed '/^\s*$/d'
    diff -u "$before_dir/system_global_defaults.plist" "$after_dir/system_global_defaults.plist" | sed '/^\s*$/d'
    
    diff -u "$before_dir/user_system_defaults.plist" "$after_dir/user_system_defaults.plist" | sed '/^\s*$/d'
    diff -u "$before_dir/system_system_defaults.plist" "$after_dir/system_system_defaults.plist" | sed '/^\s*$/d'
    
    echo "Comparing Domain Specific"
    # Domain-specific diffs
    for domain in $domains; do
        # Only run diff if both user-specific files exist
        if [ -f "$before_dir/${domain}_user_defaults.plist" ] && [ -f "$after_dir/${domain}_user_defaults.plist" ]; then
            
            #echo "Comparing user-specific defaults for domain: $domain"
            diff -u "$before_dir/${domain}_user_defaults.plist" "$after_dir/${domain}_user_defaults.plist" | sed '/^\s*$/d'
        fi
    
        # Only run diff if both system-wide files exist
        if [ -f "$before_dir/${domain}_system_defaults.plist" ] && [ -f "$after_dir/${domain}_system_defaults.plist" ]; then
            #echo "Comparing system-wide defaults for domain: $domain"
            diff -u "$before_dir/${domain}_system_defaults.plist" "$after_dir/${domain}_system_defaults.plist" | sed '/^\s*$/d'
        fi
    done
    
    diff -u "$before_dir/network_settings.plist" "$after_dir/network_settings.plist" | sed '/^\s*$/d'
    
    # Step 7: Clean up temporary files (optional, currently commented out)
    #log "Cleaning up temporary files..."
    #run_command sudo rm -r "$before_dir" "$after_dir"
    
    echo "Comparison complete."
    Code language: Bash (bash)

    This will basically do a scan of all defaults settings it can find, wait for you to make changes, and then show you a diff of what has changed.

    For a bad example, I wanted to auto hide the dock:

    $ bash default-changes.sh
    Reading user-specific global preferences...
    Reading system-wide global preferences...
    Reading user-specific system preferences...
    Reading system-wide system preferences...
    Reading defaults for all domains...
    Capturing network settings...
    Current preferences saved. Please make your changes now.
    Press any key to continue once you've made the changes...
    Reading updated user-specific global preferences...
    Reading updated system-wide global preferences...
    Reading updated user-specific system preferences...
    Reading updated system-wide system preferences...
    Reading updated defaults for all domains...
    Capturing updated network settings...
    Comparing preferences and generating diffs...
    Comparing global and system preferences...
    --- /tmp/before_defaults/user_system_defaults.plist	2024-09-30 21:23:17.183140919 -0400
    +++ /tmp/after_defaults/user_system_defaults.plist	2024-09-30 21:23:45.721177080 -0400
    @@ -95,9 +95,9 @@
         };
         ContextStoreAgent =     {
             "_DKThrottledActivityLast_DKKnowledgeStorageLogging_DKKnowledgeStorageDidInsertEventsNotification:/app/mediaUsageActivityDate" = "2024-08-15 01:49:34 +0000";
    -        "_DKThrottledActivityLast_DKKnowledgeStorageLogging_DKKnowledgeStorageDidInsertEventsNotification:/app/usageActivityDate" = "2024-10-01 01:22:53 +0000";
    +        "_DKThrottledActivityLast_DKKnowledgeStorageLogging_DKKnowledgeStorageDidInsertEventsNotification:/app/usageActivityDate" = "2024-10-01 01:23:42 +0000";
             "_DKThrottledActivityLast_DKKnowledgeStorageLogging_DKKnowledgeStorageDidInsertLocalEventsNotification:/app/mediaUsageActivityDate" = "2024-08-15 01:49:34 +0000";
    -        "_DKThrottledActivityLast_DKKnowledgeStorageLogging_DKKnowledgeStorageDidInsertLocalEventsNotification:/app/usageActivityDate" = "2024-10-01 01:22:53 +0000";
    +        "_DKThrottledActivityLast_DKKnowledgeStorageLogging_DKKnowledgeStorageDidInsertLocalEventsNotification:/app/usageActivityDate" = "2024-10-01 01:23:42 +0000";
         };
         LighthouseBitacoraFramework =     {
             "lastAggregationDate_MLHost" = "2024-08-31 00:00:00 +0000";
    @@ -6998,6 +6998,7 @@
             );
         };
         "com.apple.dock" =     {
    +        autohide = 1;
             "last-analytics-stamp" =         (
                 "748840077.891269"
             );
    @@ -12104,7 +12105,7 @@
                 "com.apple.photolibraryd.curatedlibraryprocessing" = "2024-09-30 11:58:18 +0000";
                 "com.apple.photolibraryd.periodicmaintenance" = "2024-09-29 18:28:19 +0000";
                 "com.apple.proactive.PersonalIntelligence.PersonalIntelligenceMetrics" = "2024-09-29 14:29:35 +0000";
    -            "com.apple.proactive.PersonalizationPortrait.ClientLinkStatus" = "2024-09-22 01:54:07 +0000";
    +            "com.apple.proactive.PersonalizationPortrait.ClientLinkStatus" = "2024-10-04 09:16:11 +0000";
                 "com.apple.proactive.PersonalizationPortrait.ContactHandlesCache" = "2024-09-29 23:56:51 +0000";
                 "com.apple.proactive.PersonalizationPortrait.ContactsImport" = "2024-09-29 23:57:21 +0000";
                 "com.apple.proactive.PersonalizationPortrait.CoreRoutineImport" = "2024-09-29 23:56:50 +0000";
    @@ -12115,11 +12116,11 @@
                 "com.apple.proactive.PersonalizationPortrait.ExpiredLinkReview" = "2024-09-29 23:57:21 +0000";
                 "com.apple.proactive.PersonalizationPortrait.FeedbackProcessing" = "2024-09-29 23:56:50 +0000";
                 "com.apple.proactive.PersonalizationPortrait.FeedbackStreamReviewed" = "2024-09-29 23:56:51 +0000";
    -            "com.apple.proactive.PersonalizationPortrait.LinkStatusGeneration" = "2024-09-22 01:54:07 +0000";
    +            "com.apple.proactive.PersonalizationPortrait.LinkStatusGeneration" = "2024-10-04 09:16:11 +0000";
                 "com.apple.proactive.PersonalizationPortrait.LogLocationPerplexity" = "2024-09-29 23:54:27 +0000";
    -            "com.apple.proactive.PersonalizationPortrait.LogNamedEntityFirstSource" = "2024-09-22 01:54:07 +0000";
    +            "com.apple.proactive.PersonalizationPortrait.LogNamedEntityFirstSource" = "2024-10-04 09:16:11 +0000";
                 "com.apple.proactive.PersonalizationPortrait.LogNamedEntityPerplexity" = "2024-09-29 23:56:52 +0000";
    -            "com.apple.proactive.PersonalizationPortrait.LogTopicFirstSource" = "2024-09-22 01:54:07 +0000";
    +            "com.apple.proactive.PersonalizationPortrait.LogTopicFirstSource" = "2024-10-04 09:16:11 +0000";
                 "com.apple.proactive.PersonalizationPortrait.LogTopicPerplexity" = "2024-09-29 23:57:22 +0000";
                 "com.apple.proactive.PersonalizationPortrait.MapsImport" = "2024-09-29 23:57:22 +0000";
                 "com.apple.proactive.PersonalizationPortrait.NamedEntityFiltering" = "2024-09-29 23:57:22 +0000";
    @@ -12136,7 +12137,7 @@
                 "com.apple.proactive.PersonalizationPortrait.TopicImport" = "2024-09-26 17:42:30 +0000";
                 "com.apple.proactive.PersonalizationPortrait.TopicRepairAndExport" = "2024-09-26 17:45:06 +0000";
                 "com.apple.proactive.PersonalizationPortrait.UnsupportedClient" = "2024-09-29 23:57:21 +0000";
    -            "com.apple.proactive.PersonalizationPortrait.VacuumDatabase" = "2024-09-22 01:54:07 +0000";
    +            "com.apple.proactive.PersonalizationPortrait.VacuumDatabase" = "2024-10-04 09:16:11 +0000";
                 "com.apple.proactive.ProactiveHarvesting.Cleanup" = "2024-09-29 14:29:35 +0000";
                 "com.apple.proactive.ProactiveHarvesting.Harvest.PeriodicBackground" = "2024-09-29 21:54:28 +0000";
                 "com.apple.proactived.contextualactions.training" = "2024-09-28 03:57:02 +0000";
    --- /tmp/before_defaults/system_system_defaults.plist	2024-09-30 21:23:17.281165387 -0400
    +++ /tmp/after_defaults/system_system_defaults.plist	2024-09-30 21:23:45.810771555 -0400
    @@ -374,7 +374,7 @@
                 "501:com.apple.mlhost.telemetry.daily" = "2024-09-26 21:59:29 +0000";
                 "501:com.apple.mlhostd.daily" = "2024-09-28 08:35:02 +0000";
                 "501:com.apple.parsec.SafariBrowsingAssistant" = "2024-09-27 02:53:00 +0000";
    -            "501:com.apple.photoanalysisd.backgroundanalysis" = "2024-09-30 20:14:26 +0000";
    +            "501:com.apple.photoanalysisd.backgroundanalysis" = "2024-10-01 00:02:14 +0000";
                 "501:com.apple.photoanalysisd.graphNonIntensiveTasks" = "2024-09-30 20:20:03 +0000";
                 "501:com.apple.photoanalysisd.internal" = "2024-09-15 01:53:51 +0000";
                 "501:com.apple.photoanalysisd.music" = "2024-09-30 17:05:59 +0000";
    @@ -2312,7 +2312,7 @@
             LastOSLaunchVersion = 24A335;
             "baseDate.LocalBeaconingManager" = "2023-06-01 15:07:33 +0000";
             lastAttemptDate = "2024-08-15 01:48:08 +0000";
    -        lastFinderAttemptDate = "2024-10-01 01:23:05 +0000";
    +        lastFinderAttemptDate = "2024-10-01 01:23:36 +0000";
             lastFinderPublishDates =         {
                 batteryWiFi =             (
                     "2024-09-21 01:07:39 +0000",
    @@ -3859,7 +3859,7 @@
                 "com.apple.awdd.publication" = "2024-09-29 18:17:55 +0000";
                 "com.apple.awdd.trigger:0x7f004:86400:2" = "2024-09-28 13:31:28 +0000";
                 "com.apple.awdd.trigger:0x7f006:14400:2" = "2024-09-30 05:24:18 +0000";
    -            "com.apple.backupd-auto" = "2024-10-01 01:08:37 +0000";
    +            "com.apple.backupd-auto" = "2024-10-01 01:38:37 +0000";
                 "com.apple.backupd-auto.dryspell" = "2024-09-28 01:22:46 +0000";
                 "com.apple.backupd.analytics" = "2024-09-28 05:36:06 +0000";
                 "com.apple.biome.prune-expired-events" = "2024-09-28 03:56:23 +0000";
    Comparing Domain Specific
    Comparison complete.Code language: PHP (php)

    You can see that there’s a lot of background noise, but in there is what I was looking for: com.apple.dock and autohide = 1.

    Now I can head over to macos-defaults.com and I can search for com.apple.doc and find the command to set the dock to auto hide.

    defaults write com.apple.dock "autohide" -bool "true" && killall Dock

    Thinking about it, this was probably a dumb example as it was easy to just go to macos-defaults.com and search for “autohide” to find it.

    Well, any way do what you want with this stupid thing.

  • Macbook Battery Stats in Your ZSH Terminal Prompt

    Macbook Battery Stats in Your ZSH Terminal Prompt

    As a power user of my Macbook, I’ve found that I often overlook the small battery icon on my menu bar, especially when I’m immersed in a fun project. This minor inconvenience sparked a thought: why not incorporate the battery status directly into my terminal prompt? Thus, I embarked on a fun exploration into ZSH scripting. With a bit of coding magic, I was able to enhance my terminal prompt to dynamically display my Macbook’s battery percentage. Let me guide you through the process.

    We start by loading the ZSH hook module. This module allows us to add functions that run before and/or after each command, giving us the ability to update our battery status prompt in real-time.

    autoload -U add-zsh-hookCode language: Bash (bash)

    The Battery Status Function

    Next, I crafted a function, terminal_battery_stats, that retrieves battery information and displays it in the terminal prompt. Here’s how it works:

    function terminal_battery_stats {
        # Retrieve battery statistics using the pmset command. This is a macOS
        # command that allows power management and battery status retrieval.
        # The awk command is used to format the output into a useful string.
        bat_info=$(pmset -g batt | awk 'NR==2 {gsub(/;/,""); print $3 " " $4}')
        
        # Extract the battery percentage and state from the bat_info string.
        bat_percent=$(echo $bat_info | cut -d' ' -f1 | tr -d '%')
        bat_state=$(echo $bat_info | cut -d' ' -f2)
    
        # Check if the battery is charging or on AC power.
        if [ $bat_state = 'charging' ] || [ $bat_state = 'AC' ] || [ $bat_state = 'charged' ] || [ $bat_state = 'finishing' ]; then
            # If the battery is over 66%, don't display a battery prompt.
            if [ $bat_percent -gt 66 ]; then
                bat_prompt=""
            else
                # Otherwise, set the battery icon to a plug, and the color to green.
                bat_icon='🔌'
                bat_color='%F{green}'
                # Format the prompt with the battery color, percentage, and icon.
                bat_prompt="〔$bat_color$bat_percent%% $bat_icon%f〕"
            fi
        else
            # If the battery is discharging, choose a battery icon and color based on the battery level.
            if [ $bat_percent -le 33 ]; then
                bat_icon='🪫'
                bat_color='%F{red}'
            elif [ $bat_percent -gt 66 ]; then
                bat_icon='🔋'
                bat_color='%F{green}'
            else
                bat_icon='🔋'
                bat_color='%F{yellow}'
            fi
            # Format the prompt with the battery color, percentage, and icon.
            bat_prompt="〔$bat_color$bat_percent%% $bat_icon%f〕"
        fi
    
        # Check if the current prompt already contains a battery status.
        if [[ "$PROMPT" == *"〔"* ]]; then
            # If it does, remove the existing battery status from the prompt.
            PROMPT=${PROMPT#*"〕"}
        fi
    
        # Add the new battery status to the prompt.
        PROMPT="${bat_prompt}${PROMPT}"
    }Code language: Bash (bash)

    To get some basic understanding of the magic behind ZSH scripting and manipulating the terminal prompt, check this helpful resource.

    Applying the Battery Status Function

    After creating the function, I added terminal_battery_stats to the command prompt via ZSH’s pre-command hook. Now, my function runs before each command entered in the terminal, keeping the battery stats up-to-date.

    add-zsh-hook precmd terminal_battery_statsCode language: Bash (bash)

    All the above code is added to my ~/.zshrc file, turning my terminal prompt into a dynamic display of my Macbook’s battery status. The resulting terminal prompt looks like this:

    Conclusion

    Through the power of ZSH scripting magic, my terminal now offers real-time updates of my Macbook’s battery status after every command. I set it to disappear once the battery reaches 67%, a level I consider to be within the safe zone. This is an excellent example of how minor inconveniences can lead to innovative solutions that enhance productivity.

    Here’s the full script ready to drop in to your own ~/.zshrc file:


    # Load the zsh hook module. This is a module that allows adding functions
    # that get run before and/or after each command.
    autoload -U add-zsh-hook
    
    # Function to retrieve and display battery statistics in the terminal prompt.
    # Uses the pmset command to retrieve battery information, and awk to format
    # it into a useful string. Depending on the battery's state and level, 
    # different icons and colors will be displayed in the terminal prompt.
    # 
    # @return void
    function terminal_battery_stats {
        # Retrieve battery statistics using the pmset command. This is a macOS
        # command that allows power management and battery status retrieval.
        # The awk command is used to format the output into a useful string.
        bat_info=$(pmset -g batt | awk 'NR==2 {gsub(/;/,""); print $3 " " $4}')
        
        # Extract the battery percentage and state from the bat_info string.
        bat_percent=$(echo $bat_info | cut -d' ' -f1 | tr -d '%')
        bat_state=$(echo $bat_info | cut -d' ' -f2)
    
        # Check if the battery is charging or on AC power.
        if [ $bat_state = 'charging' ] || [ $bat_state = 'AC' ] || [ $bat_state = 'charged' ] || [ $bat_state = 'finishing' ]; then
            # If the battery is over 66%, don't display a battery prompt.
            if [ $bat_percent -gt 66 ]; then
                bat_prompt=""
            else
                # Otherwise, set the battery icon to a plug, and the color to green.
                bat_icon='🔌'
                bat_color='%F{green}'
                # Format the prompt with the battery color, percentage, and icon.
                bat_prompt="〔$bat_color$bat_percent%% $bat_icon%f〕"
            fi
        else
            # If the battery is discharging, choose a battery icon and color based on the battery level.
            if [ $bat_percent -le 33 ]; then
                bat_icon='🪫'
                bat_color='%F{red}'
            elif [ $bat_percent -gt 66 ]; then
                bat_icon='🔋'
                bat_color='%F{green}'
            else
                bat_icon='🔋'
                bat_color='%F{yellow}'
            fi
            # Format the prompt with the battery color, percentage, and icon.
            bat_prompt="〔$bat_color$bat_percent%% $bat_icon%f〕"
        fi
    
        # Check if the current prompt already contains a battery status.
        if [[ "$PROMPT" == *"〔"* ]]; then
            # If it does, remove the existing battery status from the prompt.
            PROMPT=${PROMPT#*"〕"}
        fi
    
        # Add the new battery status to the prompt.
        PROMPT="${bat_prompt}${PROMPT}"
    }
    
    # Adds the function terminal_battery_stats to the command prompt 
    # meaning it will be run before each command entered in the terminal. 
    add-zsh-hook precmd terminal_battery_stats
    
    Code language: Bash (bash)

    Good luck!

  • Supercharge Your Clipboard with a Shell Function for iTerm2

    Supercharge Your Clipboard with a Shell Function for iTerm2

    Well, I’ve been playing with ChatGPT more, and I had ChatGPT (GPT-4) write this blog post for me. I told it that I was going to give it some of my blog posts to determine my writing style, and to have it write me a blog post about this bash function. It’s …. meh … not really “my style” but whatever.

    The idea of this shell function is to integrate with iTerm2’s proprietary escape sequences to allow you to pipe content right to your clipboard. I’m using the name pbcopy from MacOS so that I don’t need to think about it, and can use pbcopy anywhere. Now I can work on a remote server and cat stupid-stuff.log | pbcopy and get a copy of it locally to mess with, without having to click and drag or download the file. Super lazy ❇

    Enjoy the AI blog post:


    Hey folks, today we’re going to explore a neat shell function that can make your life a lot easier when you’re working in iTerm2 on macOS. The purpose of this function is to make the built-in pbcopy command work seamlessly in iTerm2, even when the command isn’t available in your shell environment.

    Without further ado, let’s dive into the code:

    # pbcopy via iTerm2
    function pbcopy() {
    	if which pbcopy >/dev/null 2>&1; then
    		pbcopy "$@"
    	else
    		# Replace ^[ with the ASCII escape character
    		local start="\e]1337;CopyToClipboard\a"
    		local end="\e]1337;EndCopy\a"
    		printf "${start}$(cat)${end}"
    	fi
    }
    Code language: PHP (php)

    You might be wondering how this magic works. Let’s break it down step by step:

    1. The function first checks if the pbcopy command is available in your shell environment using the which command. If it is, it simply calls the built-in pbcopy command with the provided arguments.
    2. If the pbcopy command isn’t available, the function creates two local variables, start and end, containing special escape sequences that iTerm2 understands.
    3. The printf command is then used to concatenate the start escape sequence, the contents of the input (read using cat), and the end escape sequence. This formatted string is what gets sent to iTerm2.

    When iTerm2 receives this specially formatted string, it recognizes the escape sequences and takes care of copying the text between them to the system clipboard.

    And that’s it! With this function in your shell environment, you can copy text to your clipboard using pbcopy without any hassle, whether the command is natively available or not. To use this function, simply add it to your shell startup file (like .bashrc or .zshrc), and you’re good to go.

    In a practical scenario, let’s say you’re working on a project and you want to share the contents of a log file with a colleague. Instead of manually opening the log file, selecting its content, and copying it to your clipboard, you can use this shell script to streamline the process. With the pbcopy function added to your shell startup file, simply open your terminal and run the command cat logfile.txt | pbcopy. This command will read the content of the logfile.txt file and pipe it directly to the pbcopy function, which in turn places the content into your clipboard. Now you can easily paste the log file content into an email, chat application, or any other medium you choose, all without leaving the comfort of your terminal. This not only saves time but also enhances your overall productivity when working with text-based data in a command-line environment.

    In conclusion, this shell function is a fantastic little tool to enhance your iTerm2 experience on macOS. I hope you find it as useful as I do. As always, if you have any questions or comments, feel free to drop them below. Happy coding!


    Happy coding, indeed 🤖

  • Stable Diffusion on M1 Macs!

    Stable Diffusion on M1 Macs!

    Run Stable Diffusion on your M1 Mac’s GPU

    Oh yes, this is going to be awesome!

    https://replicate.com/blog/run-stable-diffusion-on-m1-mac

    (via Hacker News)

  • phpMyAdmin and MariaDB with Docker

    phpMyAdmin and MariaDB with Docker

    I used to run a MariaDB server on an old Linux machine for working with database dumps and other things, but after moving all of that to a new Raspberry Pi 4, I never really set it back up.

    So instead I thought I’d play with this fancy new Docker stuff all the cool kids are talking about. I ended up getting phpMyAdmin and MariaDB working with Docker on my MacBook Pro.

    Caveat:

    To start up the MariaDB container thing, I ran this command:

    docker run -d \
     -v $HOME:/home/hosthome \
     --name mariadb \
     -e MYSQL_ROOT_PASSWORD=hunter2 \
     -e MYSQL_DATABASE='default_db' \
     mariadbCode language: JavaScript (javascript)

    A few things here you might want to make note of:

    • hunter2 – My MariaDB root password.
    • default_db – The default database created, just to make things easy.
    • $HOME – This attached my local machine’s home directory to the MariaDB container so I can import/export files.

    Secondly, I ran this to start phpMyAdmin and connect it to the Docker container:

    docker run -d \
     --name phpmyadmin \
     --link mariadb:db \
     -p 8081:80 \
     -e UPLOAD_LIMIT='4096M' \
     phpmyadmin/phpmyadminCode language: JavaScript (javascript)

    A few things here you might want to make note of:

    • 8081 – This is the local machine port that I will connect to via HTTP
    • 4096M – The default upload limit, set to 4 Gigs.

    Now, once this done, you should be able to connect to phpMyAdmin via http://localhost:8081/ and do all sorts of terrible things.

    Here’s a few more commands that may come in handy:

    Start a shell in the MariaDB container: docker exec -it mariadb bash

    Import a SQL file: docker exec -i mariadb sh -c 'exec mysql -uroot -phunter2 default_db' < /some/path/on/your/host/all-databases.sql

    Start a MariaDB “mysql” shell: docker exec -it mariadb sh -c 'exec mysql -uroot -phunter2 default_db'

    References that helped me:

  • Quick Tip: Looping a command in bash

    Quick Tip: Looping a command in bash

    I recently came across the need to watch my disk space while running a slow program to make sure I didn’t run out. If I did, the command would fail silently and I’d have to start over again.

    This can easily be done with this short snippet:

    watch -n10 bash -c "df -h | ack disk1s5"Code language: JavaScript (javascript)
    Every 10.0s: bash -c df -h | ack disk1s5                                                                                  mbp.local: Mon Jul 20 15:09:51 2020
    
    /dev/disk1s5           488245288  10940872 144033352     8%   488237 4881964643    0%   /

    The important part here is disk1s5, which is the device file for the partition I wanted to watch. If you need to find this, it can be done simply by running the df as a whole:

    $ df
    Filesystem             1K-blocks      Used Available Capacity  iused      ifree %iused  Mounted on
    /dev/disk1s5           488245288  10940872 144035124     8%   488237 4881964643    0%   /
    devfs                        191       191         0   100%      662          0  100%   /dev
    /dev/disk1s1           488245288 331456068 144035124    70%  1379027 4881073853    0%   /System/Volumes/Data
    /dev/disk1s4           488245288   1048596 144035124     1%        1 4882452879    0%   /private/var/vm
    map auto_home                  0         0         0   100%        0          0  100%   /System/Volumes/Data/home
    /dev/disk1s3           488245288    516448 144035124     1%       48 4882452832    0%   /Volumes/RecoveryCode language: PHP (php)

    That is all.

    Photo by Wendy Wei from Pexels

  • Dynamic Tea House

    Dynamic Tea House

    Not too long ago, a coworker shared that they had created a WordPress Dynamic Wallpaper for macOS. I thought this was just cool, so I eventually made one of my own with my favorite dynamic set of images: the Tea House theme from Gmail.

    Now, these classic Gmail themes are all but lost to history, and that’s a huge shame.

    With the help of some code I found on GitHub, I was able to download and reconstruct the theme as a desktop background. Unfortunately, the image sizes are rather small for modern desktops, so I also used bigjpg.com and the waifu2x image scaling algorithm to upcale these to over 5K in size:

    You can download these at Dynamic Wallpaper Club, or from the links below:

    tea-house.heic.zip

    tea-house-9×16.heic.zip

    I’ve got to thank the amazing folks at Meomi for their artwork I’ve stolen without asking. I hope they can forgive me!