Tag: terminal

  • Syntax Highlighting SQL in Terminal

    Syntax Highlighting SQL in Terminal

    Do you ever find yourself doing some debugging with error_log() or its friends? Does that debugging ever involve SQL queries? Are you tired of staring at grey queries all the time? I have just the product for you!

    Introducing Syntax Highlighting SQL in Terminal! Brought to you by our friends at Large Language Models, Incorporated, this new PHP function will use ANSI escape sequences to colorize your SQL queries for easier viewing and debugging!

    <?php
    
    /**
     * Highlights SQL queries.
     *
     * This method takes a SQL query as input and returns the query with syntax highlighting applied.
     *
     * @param string $sql The SQL query to highlight.
     *
     * @return string The highlighted SQL query.
     */
    function highlight_sql( string $sql ): string {
    	$keywords = array(
    		'SELECT',
    		'FROM',
    		'WHERE',
    		'AND',
    		'OR',
    		'INSERT',
    		'INTO',
    		'VALUES',
    		'UPDATE',
    		'SET',
    		'DELETE',
    		'CREATE',
    		'TABLE',
    		'ALTER',
    		'DROP',
    		'JOIN',
    		'INNER',
    		'LEFT',
    		'RIGHT',
    		'ON',
    		'AS',
    		'DISTINCT',
    		'GROUP',
    		'BY',
    		'ORDER',
    		'HAVING',
    		'LIMIT',
    		'OFFSET',
    		'UNION',
    		'ALL',
    		'COUNT',
    		'SUM',
    		'AVG',
    		'MIN',
    		'MAX',
    		'LIKE',
    		'IN',
    		'BETWEEN',
    		'IS',
    		'NULL',
    		'NOT',
    		'PRIMARY',
    		'KEY',
    		'FOREIGN',
    		'REFERENCES',
    		'DEFAULT',
    		'AUTO_INCREMENT',
    	);
    
    	$functions = array(
    		'COUNT',
    		'SUM',
    		'AVG',
    		'MIN',
    		'MAX',
    		'NOW',
    		'CURDATE',
    		'CURTIME',
    		'DATE',
    		'TIME',
    		'YEAR',
    		'MONTH',
    		'DAY',
    		'HOUR',
    		'MINUTE',
    		'SECOND',
    		'TIMESTAMP',
    	);
    
    	$colors = array(
    		'keyword'  => "\033[1;34m", // Blue.
    		'function' => "\033[1;32m", // Green.
    		'string'   => "\033[1;33m", // Yellow.
    		'comment'  => "\033[1;90m", // Bright Black (Gray).
    		'reset'    => "\033[0m",
    	);
    
    	// Highlight comments.
    	$sql = preg_replace( '/\/\*.*?\*\//s', $colors['comment'] . '$0' . $colors['reset'], $sql );
    
    	// Highlight single-quoted strings.
    	$sql = preg_replace( '/\'[^\']*\'/', $colors['string'] . '$0' . $colors['reset'], $sql );
    
    	// Highlight double-quoted strings.
    	$sql = preg_replace( '/"[^"]*"/', $colors['string'] . '$0' . $colors['reset'], $sql );
    
    	// Highlight functions.
    	foreach ( $functions as $function ) {
    		$sql = preg_replace( '/\b' . preg_quote($function, '/') . '\b/i', $colors['function'] . '$0' . $colors['reset'], $sql );
    	}
    
    	// Highlight keywords.
    	foreach ( $keywords as $keyword ) {
    		$sql = preg_replace( '/\b' . preg_quote($keyword, '/') . '\b/i', $colors['keyword'] . '$0' . $colors['reset'], $sql );
    	}
    
    	return $sql;
    }
    
    echo highlight_sql( 'SELECT COUNT(*) AS total FROM users WHERE id = 1 AND user_id = "example"; /* YEAH! Comment! */' ) . PHP_EOL;Code language: PHP (php)

    Don’t blame me if this breaks anything, use at your own debugging risk.

  • PHPCS Anywhere!

    PHPCS Anywhere!

    Something that I do often is run PHPCS on code I’m working on, almost always inside a git repository. Even more likely is that PHPCS was installed via composer, which means it will live in $GIT_ROOT/vendor/bin. So I always end up doing something like ../../../vendor/bin/phpcs file.php which is hugely annoying.

    Which is why I made this monstrosity:

    # PHPCS
    function phpcs() {
            if git rev-parse --git-dir > /dev/null 2>&1; then
                    git_root=$(git rev-parse --show-toplevel 2>/dev/null)
    
                    # Check if vendor/bin/phpcs exists
                    if [[ -x "$git_root/vendor/bin/phpcs" ]]; then
                            # Call the local vendor/bin/phpcs
                            "$git_root/vendor/bin/phpcs" "$@"
                    fi
            else
                    # Fall back to the system's default phpcs
                    command phpcs "$@"
            fi
    }
    
    # PHPCBF
    function phpcbf() {
            if git rev-parse --git-dir > /dev/null 2>&1; then
                    git_root=$(git rev-parse --show-toplevel 2>/dev/null)
    
                    # Check if vendor/bin/phpcbf exists
                    if [[ -x "$git_root/vendor/bin/phpcbf" ]]; then
                            # Call the local vendor/bin/phpcbf
                            "$git_root/vendor/bin/phpcbf" "$@"
                    fi
            else
                    # Fall back to the system's default phpcbf
                    command phpcbf "$@"
            fi
    }Code language: Bash (bash)

    Basically, what this is doing is any time I run phpcs or phpcbf it will first check if I am inside a git repository. If I am, and $GIT_ROOT/vendor/bin/phpcs exists, it will automatically find it and use it.

    Saves me seconds a day. SECONDS! Maybe you can find it useful as well. Or not. Who knows.

  • Bash Script: Calculate before/after 2: Calculate Harder

    Bash Script: Calculate before/after 2: Calculate Harder

    As an update, or an evolution of my earlier script that did some simple math for me, I’ve made one that will full-on test a URL while I’m making changes to see what the impact performance is of my updates.

    $ abtesturl.sh --url=https://example.com/ --count=10
    Press any key to run initial tests...
    Initial average TTFB: 3.538 seconds
    Press any key to re-run tests...
    
    Running second test...
    Second average TTFB: 1.975 seconds
    Before TTFB: 3.538 seconds
    After TTFB: 1.975 seconds
    Change in TTFB: -1.563 seconds
    Percentage Change: -44.00%Code language: JavaScript (javascript)

    It makes it much simpler to gather data to write reports or figure out of a change is worth the effort.

    Well, that’s about it so here’s the script:

    #!/bin/bash
    
    function show_usage() {
    	echo "Usage: $0 --url=<URL> [--count=<number of requests>]"
    	echo "  --url        Specifies the URL to test."
    	echo "  --count      Optional. Specifies the number of requests to send. Default is 6."
    	echo
    	echo "Example: $0 --url=https://example.com/ --count=5"
    	exit
    }
    
    function average_ttfb() {
    	local URL=""
    	local COUNT=6 # Default COUNT to 6 if not supplied
    	local CURL_OPTS="-s"
    
    	# Parse arguments
    	for arg in "$@"; do
    		case $arg in
    			--url=*)
    			URL="${arg#*=}"
    			shift # Remove argument from processing
    			;;
    		--count=*)
    			COUNT="${arg#*=}"
    			shift # Remove argument from processing
    			;;
    		*)
    			# Unknown option
    			;;
    		esac
    	done
    
    	if [[ -z "$URL" ]]; then
    		exit 1
    	fi
    
    	local total_time=0
    	local count_success=0
    
    	for ((i=1; i<=COUNT; i++))
    	do
    		# Perform the curl command, extracting the time to first byte
    		ttfb=$(curl $CURL_OPTS -o /dev/null -w "%{time_starttransfer}\n" $URL)
    		
    		# Check if the curl command was successful
    		if [ $? -eq 0 ]; then
    			total_time=$(echo "$total_time + $ttfb" | bc)
    			((count_success++))
    		else
    			echo "Request $i failed." >&2
    		fi
    	done
    
    	if [ $count_success -eq 0 ]; then
    		echo "All requests failed." >&2
    		return 1
    	fi
    
    	# Calculate the average TTFB
    	average_time=$(echo "scale=3; $total_time / $count_success" | bc)
    	echo $average_time # This line now simply outputs the average time
    }
    
    function ab_test_ttfb() {
    	# Run initial test
    	read -p "Press any key to run initial tests..." -n 1 -r
    	initial_ttfb=$(set -e; average_ttfb "$@"; set +e)
    	echo "Initial average TTFB: $initial_ttfb seconds"
    	
    	# Wait for user input to proceed
    	read -p "Press any key to re-run tests..." -n 1 -r
    	echo # Move to a new line
    
    	# Run second test
    	echo "Running second test..."
    	second_ttfb=$(average_ttfb "$@")
    	echo "Second average TTFB: $second_ttfb seconds"
    
    	# Calculate and output the difference and percentage change
    	difference=$(echo "$second_ttfb - $initial_ttfb" | bc)
    	percent_change=$(echo "scale=2; ($difference / $initial_ttfb) * 100" | bc)
    
    	echo "Before TTFB: $initial_ttfb seconds"
    	echo "After TTFB: $second_ttfb seconds"
    	echo "Change in TTFB: $difference seconds"
    	echo "Percentage Change: $percent_change%"
    }
    
    # Check if help is requested or no arguments are provided
    if [[ " $* " == *" --help "* ]] || [[ "$#" -eq 0 ]]; then
    	show_usage
    fi
    
    # Check if --url is in the arguments
    url_present=false
    for arg in "$@"; do
    	if [[ $arg == --url=* ]]; then
    		url_present=true
    		break
    	fi
    done
    
    if [ "$url_present" = false ]; then
    	echo "Error: --url argument is required."
    	show_usage
    fi
    
    ab_test_ttfb "$@"Code language: Bash (bash)

    Don’t break anything!

  • Matrix Reimagined: Crafting Digital Rain with Bash and ChatGPT

    Matrix Reimagined: Crafting Digital Rain with Bash and ChatGPT

    Just for fun, and I have no idea why I thought about it, I decided to work with ChatGPT (4) to build a simple bash-based version of the Matrix Digital Rain. I know there’s already better versions, like cmatrix, but we do not do things because they are easy. We do them because we are bored.

    I’ve asked ChatGPT to heavily comment the code for us so that we can see exactly what’s going on:

    #!/bin/bash
    
    # This script creates a Matrix-style falling text effect in the terminal.
    
    # Define strings for extra characters (Japanese Katakana) and extended ASCII characters
    extra_chars="๏ฝถ๏ฝท๏ฝธ๏ฝน๏ฝบ๏ฝป๏ฝผ๏ฝฝ๏ฝพ๏ฝฟ๏พ€๏พ๏พ‚๏พƒ๏พ„๏พ…๏พ†๏พ‡๏พˆ๏พ‰๏พŠ๏พ‹๏พŒ๏พ๏พŽ๏พ๏พ๏พ‘๏พ’๏พ“๏พ”๏พ•๏พ–๏พ—๏พ˜๏พ™๏พš๏พ›๏พœ๏พ"
    extended_ascii="โ”‚โ”คโ”โ””โ”ดโ”ฌโ”œโ”€โ”ผโ”˜โ”Œโ‰ก"
    
    # Define arrays of color codes for a fading green color effect, and a static color
    fade_colors=('\033[38;2;0;255;0m' '\033[38;2;0;192;0m' '\033[38;2;0;128;0m' '\033[38;2;0;64;0m' '\033[38;2;0;32;0m' '\033[38;2;0;32;0m' '\033[38;2;0;32;0m' '\033[38;2;0;32;0m' '\033[38;2;0;32;0m' '\033[38;2;0;32;0m' '\033[38;2;0;32;0m' '\033[38;2;0;32;0m' '\033[38;2;0;32;0m' '\033[38;2;0;32;0m' '\033[38;2;0;32;0m' '\033[38;2;0;32;0m' '\033[38;2;0;32;0m' '\033[38;2;0;32;0m' '\033[38;2;0;32;0m' '\033[38;2;0;32;0m' '\033[38;2;0;16;0m' '\033[38;2;0;8;0m') # Fading green colors
    static_color='\033[38;2;0;0;0m' # Static dark green color
    white_bold='\033[1;37m' # White and bold for the primary character
    
    # Get terminal dimensions
    COLUMNS=$(tput cols) # Number of columns in the terminal
    ROWS=$(tput lines) # Number of rows in the terminal
    
    
    # Hide the cursor for a cleaner effect and clear the screen
    echo -ne '\033[?25l'
    clear
    
    # Function to generate a random character from the set of extra characters and extended ASCII
    random_char() {
    	local chars="abcdefghijklmnopqrstuvwxyzABCDEFGHIJKLMNOPQRSTUVWXYZ0123456789${extra_chars}${extended_ascii}"
    	echo -n "${chars:RANDOM%${#chars}:1}"
    }
    
    # Generate a list of 1000 random characters
    random_chars=""
    for (( i=0; i<1000; i++ )); do
    	random_chars+=$(random_char) # Add a random character to the end of the string
    done
    
    # Initialize a counter for cycling through the random characters
    char_counter=0 # Counter for cycling through the random characters
    
    # Initialize arrays to keep track of the position and trail characters of each column
    positions=() # Array to store the current position in each column
    trail_chars=() # Array to store the trail characters in each column
    for (( c=1; c<=COLUMNS; c++ )); do
    	positions[$c]=$((RANDOM % ROWS)) # Random starting position for each column
    	trail_chars[$c]="" # Start with an empty trail for each column
    done
    
    # Function to update the display with the falling text effect
    update_line() {
    	local last_pos=0  # Track the last position to optimize cursor movement
    
    	for (( c=1; c<=COLUMNS; c++ )); do
    		# Randomly skip updating some columns to create a dynamic effect
    		if [ $((RANDOM % 4)) -ne 0 ]; then
    			continue
    		fi
    
    		local new_char=${random_chars:$char_counter:1} # Select the next character from the random string
    		char_counter=$(( (char_counter + 1) % 1000 )) # Update the counter, cycling back after 1000
    
    		local pos=${positions[$c]} # Current position in this column
    		local trail=${trail_chars[$c]} # Current trail of characters in this column
    
    		trail_chars[$c]="${new_char}${trail:0:$((ROWS - 1))}" # Update the trail by adding new character at the top
    
    		# Render the trail of characters
    		for (( i=0; i<${#trail}; i++ )); do
    			local trail_pos=$((pos - i)) # Calculate the position for each character in the trail
    			if [ $trail_pos -ge 0 ] && [ $trail_pos -lt $ROWS ]; then
    				local color=${fade_colors[i]:-$static_color} # Choose color from the fade array or static color if beyond the array
    				if [ $i -eq 0 ]; then
    					color=$white_bold # First character in the trail is white and bold
    				fi
    				if [ $last_pos -ne $trail_pos ]; then
    					printf "%b" "\033[${trail_pos};${c}H" # Move cursor to the right position
    					last_pos=$trail_pos
    				fi
    				printf "%b" "${color}${trail:$i:1}\033[0m" # Print the character with color
    			fi
    		done
    
    		positions[$c]=$((pos + 1)) # Update the position for the next cycle
    		if [ $pos -ge $((ROWS + ${#fade_colors[@]})) ]; then
    			positions[$c]=0 # Reset position if it moves off screen
    			trail_chars[$c]=""
    		fi
    	done
    }
    
    # Main loop for continuous execution of the update_line function
    while true; do
    	update_line
    done
    
    # Reset terminal settings on exit (show cursor, clear screen, reset text format)
    echo -ne '\033[?25h' # Show cursor
    clear
    tput sgr0 # Reset text format
    Code language: PHP (php)

    Challenges Faced

    Developing the Matrix Digital Rain script presented specific challenges, especially in terms of performance. The initial use of tput for cursor manipulation proved inefficient for the dynamic text display. This issue was resolved by switching to printf and ANSI escape sequences, which significantly enhanced the rendering performance.

    Another problem arose with the use of fullwidth Katakana characters, which were incompatible with monospaced fonts, disrupting the visual flow. The solution involved adopting halfwidth Katakana, ensuring better compatibility and preserving the uniformity essential for the Matrix-style effect.

    Another notable challenge emerged in development: the inefficiency of generating random characters on the fly. Due to Bash’s slower handling of string functions, this method significantly hindered performance. To tackle this, a strategic shift was made from real-time character generation to utilizing a predefined lookup table.

    This approach involved generating a large set of pseudorandom characters before entering the main loop of the program. By doing so, I could rapidly access this table during runtime, boosting performance. This change played a crucial role in maintaining fluidity and responsiveness. It also preserved the illusion of randomness, essential for the authentic Matrix effect, thus striking a balance between performance efficiency and visual fidelity.

    If you’d like to see what it looks like, here’s an example:

    So yeah. That’s it I guess? Enjoy!

  • Macbook Battery Stats in Your ZSH Terminal Prompt

    Macbook Battery Stats in Your ZSH Terminal Prompt

    As a power user of my Macbook, I’ve found that I often overlook the small battery icon on my menu bar, especially when I’m immersed in a fun project. This minor inconvenience sparked a thought: why not incorporate the battery status directly into my terminal prompt? Thus, I embarked on a fun exploration into ZSH scripting. With a bit of coding magic, I was able to enhance my terminal prompt to dynamically display my Macbook’s battery percentage. Let me guide you through the process.

    We start by loading the ZSH hook module. This module allows us to add functions that run before and/or after each command, giving us the ability to update our battery status prompt in real-time.

    autoload -U add-zsh-hookCode language: Bash (bash)

    The Battery Status Function

    Next, I crafted a function, terminal_battery_stats, that retrieves battery information and displays it in the terminal prompt. Here’s how it works:

    function terminal_battery_stats {
        # Retrieve battery statistics using the pmset command. This is a macOS
        # command that allows power management and battery status retrieval.
        # The awk command is used to format the output into a useful string.
        bat_info=$(pmset -g batt | awk 'NR==2 {gsub(/;/,""); print $3 " " $4}')
        
        # Extract the battery percentage and state from the bat_info string.
        bat_percent=$(echo $bat_info | cut -d' ' -f1 | tr -d '%')
        bat_state=$(echo $bat_info | cut -d' ' -f2)
    
        # Check if the battery is charging or on AC power.
        if [ $bat_state = 'charging' ] || [ $bat_state = 'AC' ] || [ $bat_state = 'charged' ] || [ $bat_state = 'finishing' ]; then
            # If the battery is over 66%, don't display a battery prompt.
            if [ $bat_percent -gt 66 ]; then
                bat_prompt=""
            else
                # Otherwise, set the battery icon to a plug, and the color to green.
                bat_icon='๐Ÿ”Œ'
                bat_color='%F{green}'
                # Format the prompt with the battery color, percentage, and icon.
                bat_prompt="ใ€”$bat_color$bat_percent%% $bat_icon%fใ€•"
            fi
        else
            # If the battery is discharging, choose a battery icon and color based on the battery level.
            if [ $bat_percent -le 33 ]; then
                bat_icon='๐Ÿชซ'
                bat_color='%F{red}'
            elif [ $bat_percent -gt 66 ]; then
                bat_icon='๐Ÿ”‹'
                bat_color='%F{green}'
            else
                bat_icon='๐Ÿ”‹'
                bat_color='%F{yellow}'
            fi
            # Format the prompt with the battery color, percentage, and icon.
            bat_prompt="ใ€”$bat_color$bat_percent%% $bat_icon%fใ€•"
        fi
    
        # Check if the current prompt already contains a battery status.
        if [[ "$PROMPT" == *"ใ€”"* ]]; then
            # If it does, remove the existing battery status from the prompt.
            PROMPT=${PROMPT#*"ใ€•"}
        fi
    
        # Add the new battery status to the prompt.
        PROMPT="${bat_prompt}${PROMPT}"
    }Code language: Bash (bash)

    To get some basic understanding of the magic behind ZSH scripting and manipulating the terminal prompt, check this helpful resource.

    Applying the Battery Status Function

    After creating the function, I added terminal_battery_stats to the command prompt via ZSH’s pre-command hook. Now, my function runs before each command entered in the terminal, keeping the battery stats up-to-date.

    add-zsh-hook precmd terminal_battery_statsCode language: Bash (bash)

    All the above code is added to my ~/.zshrc file, turning my terminal prompt into a dynamic display of my Macbook’s battery status. The resulting terminal prompt looks like this:

    Conclusion

    Through the power of ZSH scripting magic, my terminal now offers real-time updates of my Macbook’s battery status after every command. I set it to disappear once the battery reaches 67%, a level I consider to be within the safe zone. This is an excellent example of how minor inconveniences can lead to innovative solutions that enhance productivity.

    Here’s the full script ready to drop in to your own ~/.zshrc file:


    # Load the zsh hook module. This is a module that allows adding functions
    # that get run before and/or after each command.
    autoload -U add-zsh-hook
    
    # Function to retrieve and display battery statistics in the terminal prompt.
    # Uses the pmset command to retrieve battery information, and awk to format
    # it into a useful string. Depending on the battery's state and level, 
    # different icons and colors will be displayed in the terminal prompt.
    # 
    # @return void
    function terminal_battery_stats {
        # Retrieve battery statistics using the pmset command. This is a macOS
        # command that allows power management and battery status retrieval.
        # The awk command is used to format the output into a useful string.
        bat_info=$(pmset -g batt | awk 'NR==2 {gsub(/;/,""); print $3 " " $4}')
        
        # Extract the battery percentage and state from the bat_info string.
        bat_percent=$(echo $bat_info | cut -d' ' -f1 | tr -d '%')
        bat_state=$(echo $bat_info | cut -d' ' -f2)
    
        # Check if the battery is charging or on AC power.
        if [ $bat_state = 'charging' ] || [ $bat_state = 'AC' ] || [ $bat_state = 'charged' ] || [ $bat_state = 'finishing' ]; then
            # If the battery is over 66%, don't display a battery prompt.
            if [ $bat_percent -gt 66 ]; then
                bat_prompt=""
            else
                # Otherwise, set the battery icon to a plug, and the color to green.
                bat_icon='๐Ÿ”Œ'
                bat_color='%F{green}'
                # Format the prompt with the battery color, percentage, and icon.
                bat_prompt="ใ€”$bat_color$bat_percent%% $bat_icon%fใ€•"
            fi
        else
            # If the battery is discharging, choose a battery icon and color based on the battery level.
            if [ $bat_percent -le 33 ]; then
                bat_icon='๐Ÿชซ'
                bat_color='%F{red}'
            elif [ $bat_percent -gt 66 ]; then
                bat_icon='๐Ÿ”‹'
                bat_color='%F{green}'
            else
                bat_icon='๐Ÿ”‹'
                bat_color='%F{yellow}'
            fi
            # Format the prompt with the battery color, percentage, and icon.
            bat_prompt="ใ€”$bat_color$bat_percent%% $bat_icon%fใ€•"
        fi
    
        # Check if the current prompt already contains a battery status.
        if [[ "$PROMPT" == *"ใ€”"* ]]; then
            # If it does, remove the existing battery status from the prompt.
            PROMPT=${PROMPT#*"ใ€•"}
        fi
    
        # Add the new battery status to the prompt.
        PROMPT="${bat_prompt}${PROMPT}"
    }
    
    # Adds the function terminal_battery_stats to the command prompt 
    # meaning it will be run before each command entered in the terminal. 
    add-zsh-hook precmd terminal_battery_stats
    
    Code language: Bash (bash)

    Good luck!

  • Supercharge Your Clipboard with a Shell Function for iTerm2

    Supercharge Your Clipboard with a Shell Function for iTerm2

    Well, I’ve been playing with ChatGPT more, and I had ChatGPT (GPT-4) write this blog post for me. I told it that I was going to give it some of my blog posts to determine my writing style, and to have it write me a blog post about this bash function. It’s …. meh … not really “my style” but whatever.

    The idea of this shell function is to integrate with iTerm2’s proprietary escape sequences to allow you to pipe content right to your clipboard. I’m using the name pbcopy from MacOS so that I don’t need to think about it, and can use pbcopy anywhere. Now I can work on a remote server and cat stupid-stuff.log | pbcopy and get a copy of it locally to mess with, without having to click and drag or download the file. Super lazy โ‡

    Enjoy the AI blog post:


    Hey folks, today we’re going to explore a neat shell function that can make your life a lot easier when you’re working in iTerm2 on macOS. The purpose of this function is to make the built-in pbcopy command work seamlessly in iTerm2, even when the command isn’t available in your shell environment.

    Without further ado, let’s dive into the code:

    # pbcopy via iTerm2
    function pbcopy() {
    	if which pbcopy >/dev/null 2>&1; then
    		pbcopy "$@"
    	else
    		# Replace ^[ with the ASCII escape character
    		local start="\e]1337;CopyToClipboard\a"
    		local end="\e]1337;EndCopy\a"
    		printf "${start}$(cat)${end}"
    	fi
    }
    Code language: PHP (php)

    You might be wondering how this magic works. Let’s break it down step by step:

    1. The function first checks if the pbcopy command is available in your shell environment using the which command. If it is, it simply calls the built-in pbcopy command with the provided arguments.
    2. If the pbcopy command isn’t available, the function creates two local variables, start and end, containing special escape sequences that iTerm2 understands.
    3. The printf command is then used to concatenate the start escape sequence, the contents of the input (read using cat), and the end escape sequence. This formatted string is what gets sent to iTerm2.

    When iTerm2 receives this specially formatted string, it recognizes the escape sequences and takes care of copying the text between them to the system clipboard.

    And that’s it! With this function in your shell environment, you can copy text to your clipboard using pbcopy without any hassle, whether the command is natively available or not. To use this function, simply add it to your shell startup file (like .bashrc or .zshrc), and you’re good to go.

    In a practical scenario, let’s say you’re working on a project and you want to share the contents of a log file with a colleague. Instead of manually opening the log file, selecting its content, and copying it to your clipboard, you can use this shell script to streamline the process. With the pbcopy function added to your shell startup file, simply open your terminal and run the command cat logfile.txt | pbcopy. This command will read the content of the logfile.txt file and pipe it directly to the pbcopy function, which in turn places the content into your clipboard. Now you can easily paste the log file content into an email, chat application, or any other medium you choose, all without leaving the comfort of your terminal. This not only saves time but also enhances your overall productivity when working with text-based data in a command-line environment.

    In conclusion, this shell function is a fantastic little tool to enhance your iTerm2 experience on macOS. I hope you find it as useful as I do. As always, if you have any questions or comments, feel free to drop them below. Happy coding!


    Happy coding, indeed ๐Ÿค–

  • Command Timing in ZSH

    Command Timing in ZSH

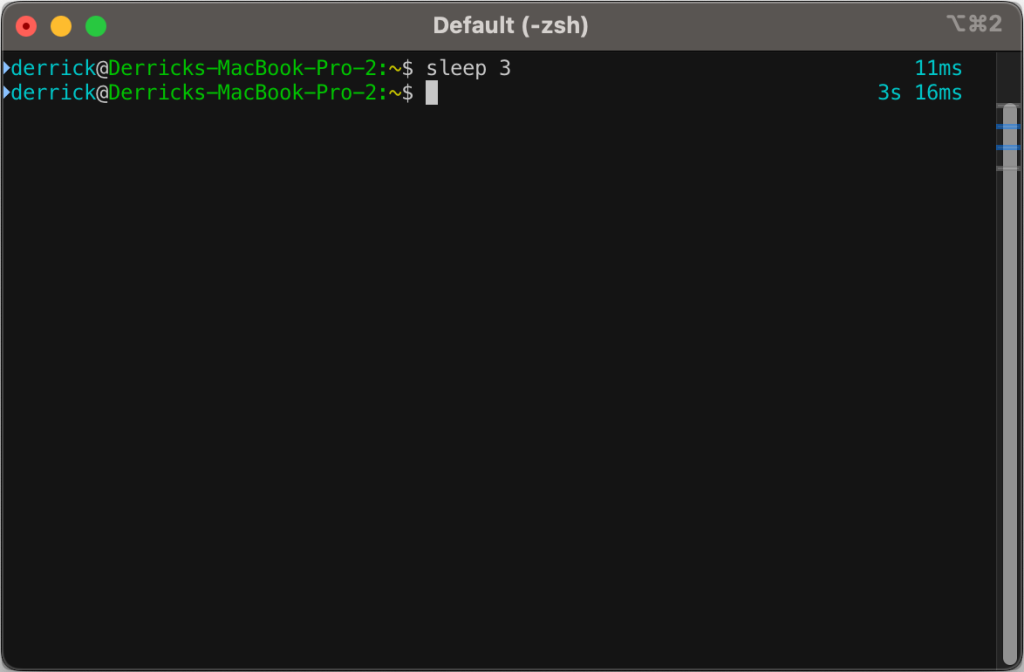
    I’ve had a few snippets in my .zshrc file for a while now that will output how long a command takes to process.

    First off, I’d like to say that I did not come up with this idea, and I didn’t really write the code. I’ve snipped it from somewhere and modified it over time, so I am very sorry to the original author for not being able to give full credit. I didn’t save where I got it from–so if anyone comes across this in the future and might know where the idea came from, drop it in the comments.

    Now, on to the fun:

    The original script only went down to the second, but I wanted more granularity than that, so I went down to the millisecond.

    You’ll likely need to install gdate (brew install gdate) for this to work properly.

    The code (added to ~/.zshrc):

    function preexec() {
    	timer=$(($(gdate +%s%0N)/1000000))
    }
    
    function precmd() {
    	if [ "$timer" ]; then
    		now=$(($(gdate +%s%0N)/1000000))
    		elapsed=$now-$timer
    
    		reset_color=$'\e[00m'
    		RPROMPT="%F{cyan} $(converts "$elapsed") %{$reset_color%}"
    		export RPROMPT
    		unset timer
    	fi
    }
    
    converts() {
    	local t=$1
    
    	local d=$((t/1000/60/60/24))
    	local h=$((t/1000/60/60%24))
    	local m=$((t/100/60%60))
    	local s=$((t/1000%60))
    	local ms=$((t%1000))
    
    	if [[ $d -gt 0 ]]; then
    			echo -n " ${d}d"
    	fi
    	if [[ $h -gt 0 ]]; then
    			echo -n " ${h}h"
    	fi
    	if [[ $m -gt 0 ]]; then
    			echo -n " ${m}m"
    	fi
    	if [[ $s -gt 0 ]]; then
    		echo -n " ${s}s"
    	fi
    	if [[ $ms -gt 0 ]]; then
    		echo -n " ${ms}ms"
    	fi
    	echo
    }Code language: PHP (php)
  • Quick Tip: Looping a command in bash

    Quick Tip: Looping a command in bash

    I recently came across the need to watch my disk space while running a slow program to make sure I didn’t run out. If I did, the command would fail silently and I’d have to start over again.

    This can easily be done with this short snippet:

    watch -n10 bash -c "df -h | ack disk1s5"Code language: JavaScript (javascript)
    Every 10.0s: bash -c df -h | ack disk1s5                                                                                  mbp.local: Mon Jul 20 15:09:51 2020
    
    /dev/disk1s5           488245288  10940872 144033352     8%   488237 4881964643    0%   /

    The important part here is disk1s5, which is the device file for the partition I wanted to watch. If you need to find this, it can be done simply by running the df as a whole:

    $ df
    Filesystem             1K-blocks      Used Available Capacity  iused      ifree %iused  Mounted on
    /dev/disk1s5           488245288  10940872 144035124     8%   488237 4881964643    0%   /
    devfs                        191       191         0   100%      662          0  100%   /dev
    /dev/disk1s1           488245288 331456068 144035124    70%  1379027 4881073853    0%   /System/Volumes/Data
    /dev/disk1s4           488245288   1048596 144035124     1%        1 4882452879    0%   /private/var/vm
    map auto_home                  0         0         0   100%        0          0  100%   /System/Volumes/Data/home
    /dev/disk1s3           488245288    516448 144035124     1%       48 4882452832    0%   /Volumes/RecoveryCode language: PHP (php)

    That is all.

    Photo by Wendy Wei from Pexels

  • Quick Tip: Viewing Headers With Curl

    Quick Tip: Viewing Headers With Curl

    Something that I do often at work is to check HTTP headers for random things such as redirects, cache headers, proxies, ssl, etc.

    A common way this is done is by using the -I (--header) switch:

    $ curl -I http://example.com/
    HTTP/1.1 200 OK
    Content-Encoding: gzip
    Accept-Ranges: bytes
    Cache-Control: max-age=604800
    Content-Type: text/html
    Date: Wed, 27 Jun 2018 22:03:57 GMT
    Etag: "1541025663+gzip"
    Expires: Wed, 04 Jul 2018 22:03:57 GMT
    Last-Modified: Fri, 09 Aug 2013 23:54:35 GMT
    Server: ECS (atl/FC94)
    X-Cache: HIT
    Content-Length: 606
    Code language: JavaScript (javascript)

    The downside to this is that it uses an HTTP HEAD request, which can sometimes return different headers or different information than a standard GET request. This can be fixed by using the -X (--request) switch. This overrides the default HEAD?request with whatever you choose:

    $ curl -I -XGET http://example.com/
    HTTP/1.1 200 OK
    Accept-Ranges: bytes
    Cache-Control: max-age=604800
    Content-Type: text/html
    Date: Wed, 27 Jun 2018 22:07:47 GMT
    Etag: "1541025663"
    Expires: Wed, 04 Jul 2018 22:07:47 GMT
    Last-Modified: Fri, 09 Aug 2013 23:54:35 GMT
    Server: ECS (atl/FC90)
    Vary: Accept-Encoding
    X-Cache: HIT
    Content-Length: 1270
    Code language: JavaScript (javascript)

    I like to just combine them into one quick command: curl -IXGET http://example.com/