Sometimes when you’re working with a local site, especially with existing data, and need to log in as a user and don’t want to mess with resetting the password (or there’s some weird SSO/MFA that’s getting in the way) you just want it to work.
Well, here you go. This snippet will automatically log you in to WordPress using the admin login. I don’t recommend using this anywhere near production or on a server that’s publicly available–for obvious reasons.
But anyway, here’s the bad idea:
<?php/**
* Force login as admin user on every request.
*/functionlol_bad_idea_force_admin_login(): void{
wp_die( 'This is a really bad idea!' ); // Remove this, it's here to stop copy paste problems for people who don't read the code.// Check if user is not already logged in.if ( ! is_user_logged_in() ) {
// Grab user object by login name.
$user = get_user_by( 'login', 'admin' );
if ( $user ) {
// Set the current user to this admin account.
wp_set_current_user( $user->ID );
// Set the WordPress auth cookie.
wp_set_auth_cookie( $user->ID );
}
}
}
add_action( 'init', 'lol_bad_idea_force_admin_login' );
Code language:PHP(php)
Something that I do often is run PHPCS on code I’m working on, almost always inside a git repository. Even more likely is that PHPCS was installed via composer, which means it will live in $GIT_ROOT/vendor/bin. So I always end up doing something like ../../../vendor/bin/phpcs file.php which is hugely annoying.
Which is why I made this monstrosity:
# PHPCSfunctionphpcs() {
if git rev-parse --git-dir > /dev/null 2>&1; then
git_root=$(git rev-parse --show-toplevel 2>/dev/null)
# Check if vendor/bin/phpcs existsif [[ -x "$git_root/vendor/bin/phpcs" ]]; then# Call the local vendor/bin/phpcs"$git_root/vendor/bin/phpcs""$@"fielse# Fall back to the system's default phpcscommand phpcs "$@"fi
}
# PHPCBFfunctionphpcbf() {
if git rev-parse --git-dir > /dev/null 2>&1; then
git_root=$(git rev-parse --show-toplevel 2>/dev/null)
# Check if vendor/bin/phpcbf existsif [[ -x "$git_root/vendor/bin/phpcbf" ]]; then# Call the local vendor/bin/phpcbf"$git_root/vendor/bin/phpcbf""$@"fielse# Fall back to the system's default phpcbfcommand phpcbf "$@"fi
}Code language:Bash(bash)
Basically, what this is doing is any time I run phpcs or phpcbf it will first check if I am inside a git repository. If I am, and $GIT_ROOT/vendor/bin/phpcs exists, it will automatically find it and use it.
Saves me seconds a day. SECONDS! Maybe you can find it useful as well. Or not. Who knows.
I set up a few defaults I like to have for my Pis:
# Updates, new software, and cleanup
sudo apt update && sudo apt upgrade
sudo apt install mc screen ack zsh locate git htop cockpit -y
sudo apt autoremove
# Add dotfile customizations. Sorry, it's currently private :D
git clone git@github.com:emrikol/dotfiles.git
cp -r ~/dotfiles/. ~/
sudo usermod --shell /bin/zsh derrick
zsh
# Set up root access so I can SCP in from Transmit if I need to.
sudo sed -i 's/#PermitRootLogin prohibit-password/PermitRootLogin yes/' /etc/ssh/sshd_config
sudo passwd root
# Customize Raspberry Pi settings.
sudo raspi-configCode language:Bash(bash)
After installing cockpit I believe, I had an issue where the MAC address of my Wifi kept changing randomly on each reboot. I had to follow these instructions and add this to my /etc/NetworkManager/NetworkManager.conf:
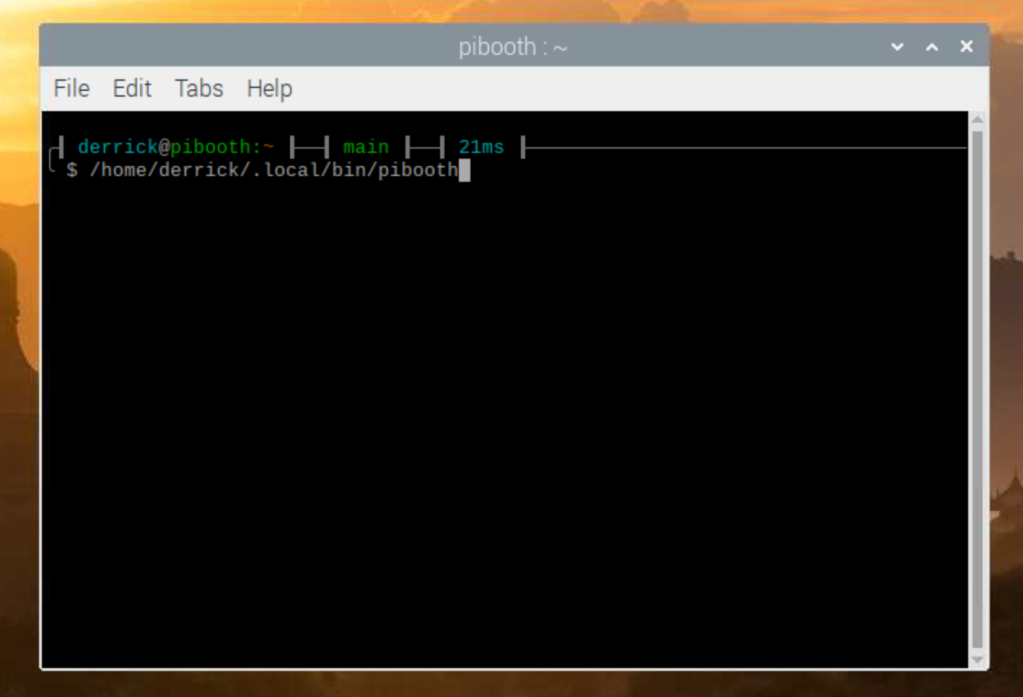
From here, we should have my default “base” Raspberry Pi setup. And now, we can work on figuring out how to install Pibooth. According to the install docs, we need to run a few commands:
$ sudo apt install "libsdl2-*"
Reading package lists... Done
Building dependency tree
Reading state information... Done
Note, selecting 'libsdl2-mixer-dev'for glob 'libsdl2-*'
Note, selecting 'libsdl2-image-dev'for glob 'libsdl2-*'
Note, selecting 'libsdl2-gfx-dev'for glob 'libsdl2-*'
Note, selecting 'libsdl2-gfx-doc'for glob 'libsdl2-*'
Note, selecting 'libsdl2-mixer-2.0-0'for glob 'libsdl2-*'
Note, selecting 'libsdl2-dbg:armhf'for glob 'libsdl2-*'
Note, selecting 'libsdl2-dev'for glob 'libsdl2-*'
Note, selecting 'libsdl2-doc'for glob 'libsdl2-*'
Note, selecting 'libsdl2-ttf-dev'for glob 'libsdl2-*'
Note, selecting 'libsdl2-net-2.0-0'for glob 'libsdl2-*'
Note, selecting 'libsdl2-net-dev'for glob 'libsdl2-*'
Note, selecting 'libsdl2-image-2.0-0'for glob 'libsdl2-*'
Note, selecting 'libsdl2-2.0-0-dbgsym:armhf'for glob 'libsdl2-*'
Note, selecting 'libsdl2-2.0-0'for glob 'libsdl2-*'
Note, selecting 'libsdl2-gfx-1.0-0'for glob 'libsdl2-*'
Note, selecting 'libsdl2-ttf-2.0-0'for glob 'libsdl2-*'
libsdl2-2.0-0 is already the newest version (2.0.9+dfsg1-1+deb10u1).
libsdl2-2.0-0set to manually installed.
Some packages could not be installed. This may mean that you have
requested an impossible situation or if you are using the unstable
distribution that some required packages have not yet been created
or been moved out of Incoming.
The following information may help to resolve the situation:
The following packages have unmet dependencies:
libsdl2-2.0-0-dbgsym:armhf : Depends: libsdl2-2.0-0:armhf (= 2.0.9+dfsg1-1+rpt1) but it is not going to be installed
E: Unable to correct problems, you have held broken packages.Code language:JavaScript(javascript)
Meh. Okay. Let’s just install all of them but the trouble package. Hopefully that won’t come back to bite us.
As a power user of my Macbook, I’ve found that I often overlook the small battery icon on my menu bar, especially when I’m immersed in a fun project. This minor inconvenience sparked a thought: why not incorporate the battery status directly into my terminal prompt? Thus, I embarked on a fun exploration into ZSH scripting. With a bit of coding magic, I was able to enhance my terminal prompt to dynamically display my Macbook’s battery percentage. Let me guide you through the process.
We start by loading the ZSH hook module. This module allows us to add functions that run before and/or after each command, giving us the ability to update our battery status prompt in real-time.
autoload -U add-zsh-hookCode language:Bash(bash)
The Battery Status Function
Next, I crafted a function, terminal_battery_stats, that retrieves battery information and displays it in the terminal prompt. Here’s how it works:
function terminal_battery_stats {
# Retrieve battery statistics using the pmset command. This is a macOS# command that allows power management and battery status retrieval.# The awk command is used to format the output into a useful string.
bat_info=$(pmset -g batt | awk 'NR==2 {gsub(/;/,""); print $3 " " $4}')
# Extract the battery percentage and state from the bat_info string.
bat_percent=$(echo$bat_info | cut -d' ' -f1 | tr -d '%')
bat_state=$(echo$bat_info | cut -d' ' -f2)
# Check if the battery is charging or on AC power.if [ $bat_state = 'charging' ] || [ $bat_state = 'AC' ] || [ $bat_state = 'charged' ] || [ $bat_state = 'finishing' ]; then# If the battery is over 66%, don't display a battery prompt.if [ $bat_percent -gt 66 ]; then
bat_prompt=""else# Otherwise, set the battery icon to a plug, and the color to green.
bat_icon='🔌'
bat_color='%F{green}'# Format the prompt with the battery color, percentage, and icon.
bat_prompt="〔$bat_color$bat_percent%% $bat_icon%f〕"fielse# If the battery is discharging, choose a battery icon and color based on the battery level.if [ $bat_percent -le 33 ]; then
bat_icon='🪫'
bat_color='%F{red}'elif [ $bat_percent -gt 66 ]; then
bat_icon='🔋'
bat_color='%F{green}'else
bat_icon='🔋'
bat_color='%F{yellow}'fi# Format the prompt with the battery color, percentage, and icon.
bat_prompt="〔$bat_color$bat_percent%% $bat_icon%f〕"fi# Check if the current prompt already contains a battery status.if [[ "$PROMPT" == *"〔"* ]]; then# If it does, remove the existing battery status from the prompt.
PROMPT=${PROMPT#*"〕"}fi# Add the new battery status to the prompt.
PROMPT="${bat_prompt}${PROMPT}"
}Code language:Bash(bash)
To get some basic understanding of the magic behind ZSH scripting and manipulating the terminal prompt, check this helpful resource.
Applying the Battery Status Function
After creating the function, I added terminal_battery_stats to the command prompt via ZSH’s pre-command hook. Now, my function runs before each command entered in the terminal, keeping the battery stats up-to-date.
All the above code is added to my ~/.zshrc file, turning my terminal prompt into a dynamic display of my Macbook’s battery status. The resulting terminal prompt looks like this:
Conclusion
Through the power of ZSH scripting magic, my terminal now offers real-time updates of my Macbook’s battery status after every command. I set it to disappear once the battery reaches 67%, a level I consider to be within the safe zone. This is an excellent example of how minor inconveniences can lead to innovative solutions that enhance productivity.
Here’s the full script ready to drop in to your own ~/.zshrc file:
# Load the zsh hook module. This is a module that allows adding functions# that get run before and/or after each command.autoload -U add-zsh-hook
# Function to retrieve and display battery statistics in the terminal prompt.# Uses the pmset command to retrieve battery information, and awk to format# it into a useful string. Depending on the battery's state and level, # different icons and colors will be displayed in the terminal prompt.# # @return voidfunction terminal_battery_stats {
# Retrieve battery statistics using the pmset command. This is a macOS# command that allows power management and battery status retrieval.# The awk command is used to format the output into a useful string. bat_info=$(pmset -g batt | awk 'NR==2 {gsub(/;/,""); print $3 " " $4}')
# Extract the battery percentage and state from the bat_info string. bat_percent=$(echo$bat_info | cut -d' ' -f1 | tr -d '%')
bat_state=$(echo$bat_info | cut -d' ' -f2)
# Check if the battery is charging or on AC power.if [ $bat_state = 'charging' ] || [ $bat_state = 'AC' ] || [ $bat_state = 'charged' ] || [ $bat_state = 'finishing' ]; then# If the battery is over 66%, don't display a battery prompt.if [ $bat_percent -gt 66 ]; then bat_prompt=""else# Otherwise, set the battery icon to a plug, and the color to green. bat_icon='🔌' bat_color='%F{green}'# Format the prompt with the battery color, percentage, and icon. bat_prompt="〔$bat_color$bat_percent%% $bat_icon%f〕"fielse# If the battery is discharging, choose a battery icon and color based on the battery level.if [ $bat_percent -le 33 ]; then bat_icon='🪫' bat_color='%F{red}'elif [ $bat_percent -gt 66 ]; then bat_icon='🔋' bat_color='%F{green}'else bat_icon='🔋' bat_color='%F{yellow}'fi# Format the prompt with the battery color, percentage, and icon. bat_prompt="〔$bat_color$bat_percent%% $bat_icon%f〕"fi# Check if the current prompt already contains a battery status.if [[ "$PROMPT" == *"〔"* ]]; then# If it does, remove the existing battery status from the prompt. PROMPT=${PROMPT#*"〕"}fi# Add the new battery status to the prompt. PROMPT="${bat_prompt}${PROMPT}"}
# Adds the function terminal_battery_stats to the command prompt # meaning it will be run before each command entered in the terminal. add-zsh-hook precmd terminal_battery_stats
Code language:Bash(bash)
If you’re debugging core WordPress scripts, one thing you might run into is dealing with cached copies of the script. Due to how script-loader.php enqueues the core files, their versions are “hard coded” and short of editing script-loader.php as well, there’s a way to fix this via a filter:
This will apply a unique ver argument to the core scripts on each refresh, so no matter what you’re editing you should get the most recent version from both any page cache you may have and also the browser cache (🤞).
Also, don’t forget to enable SCRIPT_DEBUG if you’re hacking away at core scripts to debug issues.
I couldn’t find a good related image, so enjoy this delicious toilet paper.
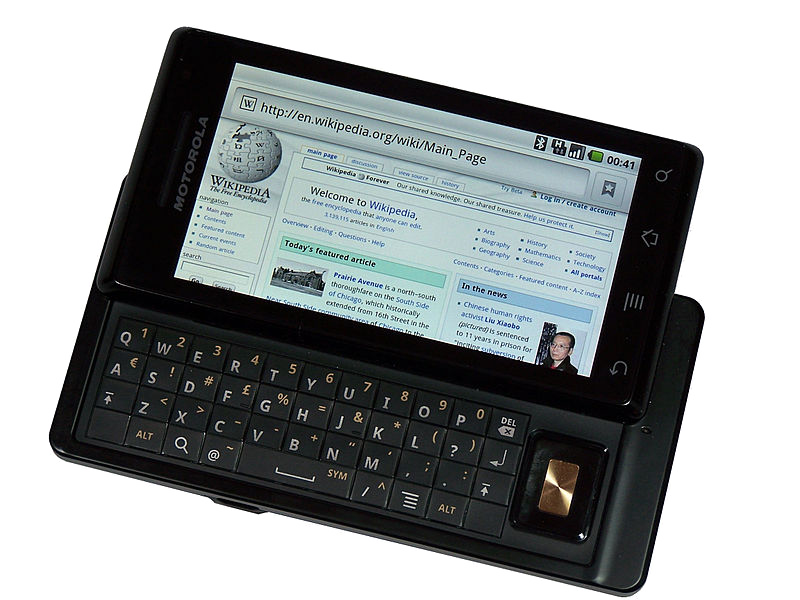
I have been a die-hard Android user since the Motorola Droid (OG Droid) came out in October 2007. The Apple iOS software world has always felt too restrictive for me, since I am forever a tinkerer.
My current phone is a Google Nexus 6 developed by Motorola, released in November 2014. Unfortunately, it’s showing its age. Google no longer sends OTA updates, so I rely on LineageOS to keep me safe and happy. Even with third-party software, the phone is plagued with problems. From incredibly slow encryption to poor CPU throttling when the battery gets low. The camera is also disgustingly slow, taking between 5-30 seconds to take and process a single picture, but at least the resulting images are beautiful.
There are saving graces though, such as the dual front-facing stereo speakers, amazing 6.0 inch 1440×2560 AMOLED screen, optical image stabilization, HDR, Qi wireless charging, and headphone jack 🙂
Unfortunately, it’s time to put my Nexus 6 aside and find a new phone. My wife has been using an iPhone for years now, after switching from Android (2014 Moto X). Today she got a new iPhone 8+, so we’ve come to an agreement that I need to at least try to use iOS for a while.
So tonight, after she migrated all of her apps and data to the new iPhone, I spent some time setting up all of my apps and accounts on her old iPhone 6s+. It’s already been a very alien experience, almost frightening–seeing how little I actually know about the software and hardware.
My plan is to use the iPhone for at least two weeks, and see how I feel about it. This also coincides closely with the release of the new Google Pixel 2 phones, which I will also be looking at. Last year I was very underwhelmed by the Google Pixel line, and felt that the hardware of the iPhone 7+ was much more advanced. If I’m able to thrive, or at least survive, in iOS then perhaps it’s time for me to truly look at switching platforms.
I’m hoping to write about this experience every day or two so that I force myself to look back at how my transition is going. I’m sure there will be many frustrations early on, but hopefully I’ll also have a good number of exciting moments when I get to experience some new and exciting software.


